Retargeting Human Performance: Motionbuilder
Motionbuilder is used to retarget your motion capture data to a character model.
Alternatively you can create your own avatar at Autodesk Character Generator*** or Adobe Fuze that we have installed on ACCAD computers. You can also download an existing avatar from Mixamo or upload your own model there for rigging. If rigging your own model it is recommendable to follow Motionbuilder skeleton naming convention for faster characterization. You can find it some guidance on creating your own skeleton here.
To retarget data:
1. Open FBX with your motion data. Go to Schematic View and delete System and Unlabeled Markers. Go back to Producer Perspective.
2. Merge FBX with a character model. When adding new skeletons to a scene check Apply Namespace to avoid skeleton mislabeling. If you already have a model in your scene and bring another model with skeleton that has identical joint names, the two skeletons will merge. This is advantageous when bringing additional takes into one file, but not good for remapping mocap data to multiple characters in one scene.
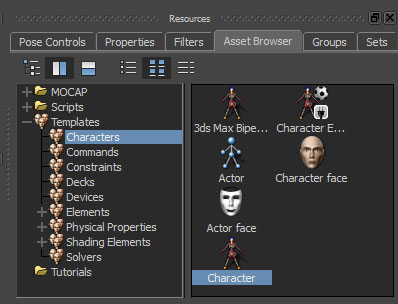
3. Make sure your Mocap Skeleton is in a T-pose. You can create the T-pose manually if it is missing from the data. From Asset Browser, grab a Character asset and drag/drop it onto the hips joint of the Mocap skeleton. Rename to Mocap.
**Read More about Character Definition below**
4.
Make sure your Model Skeleton is in a T-pose.Click CTRL+A several times until you see the skeleton through the model surface. From Asset Browser, grab a Character and LMB drag/drop it onto the hips joint of the Model skeleton (Alternatively, find Hips joint in the Navigator and drop Character asset there). Rename to Model (or something more specific). If your Model Skeleton follows Motionbuilder naming convention, the characterization will happen automatically. If not, you will have to X+drag(Maya) or ALT+Drag(MoBu) each bone in an appropriate slot in the Character Definition list. You may also have to do manual remapping bone assignment when experimenting with higher resolution or custom skeletons.
5. Select Model Character in the Navigator, double click to expose Settings. In Character Settings choose Character as Input Type and Mocap (character) as Input Source. Click Active to view the motion in your model.
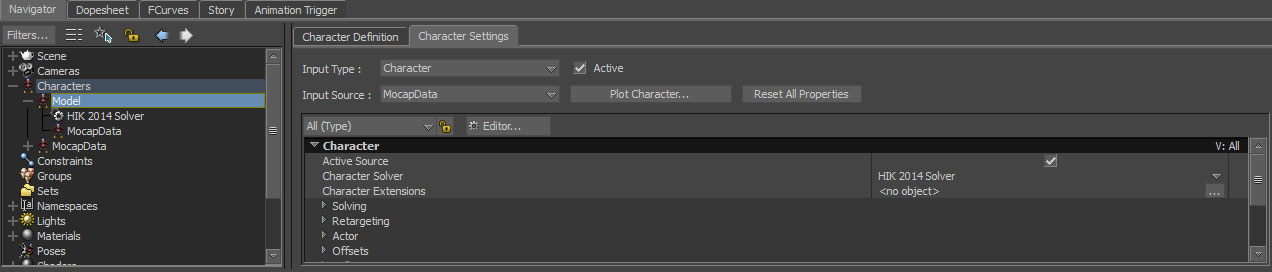
6. Experiment with Character Settings to adjust the general fit. Experiment with the Solving and Retargeting slider values. This is a craft more than science and may require different focus for different types of characters, their proportions relative to that of your mocap performers and their actions.
In general it helps to turn on Floor Contacts (in Modifiers section) and Match Source (in Retargeting section).
In the Reach section it's almost always necessary to adjust Hand, Elbow and Chest reach (T=translation, R=rotation), Realistic Shoulders), especially if the performer is handling a prop.
For Floor Contact switch between Toes and Ankle as Pivot points to see what fits your data best (ie ballet performance would benefit from Toes as a pivot setting).
In Offsets you MAY need to adjust Hips Height or Feet Spacing. If you want to use mocap data to drive the motion of the Model skeleton, but have a different location, orientation and size, do not check Match Source and use the Master/Reference/Top node of the Model skeleton hierarchy to adjust the location, rotation and size of the model.
If your character has some extreme back bending happening in the take you may want to play with Stretch settings for the spine joints.
You will probably find that some extreme poses will look unnatural and cannot be fixed with Character Settings. This is ok and means some extra work needs to be done either to change/improve the rig of the target model or correct with additional animation, using Control Rig and Animation Layer(s) in Motionbuilder.
For example
it is common to see shoulders of a character rolling/sloping/collapsing in a way that cannot be fixed with Character Settings alone. To help that you may choose to adjust clavicle bones on the model skeleton to point upward and back, rather than form a 90 degree angle with a spine or slope down. You can make the adjustments only prior to Characterizing. It's best to adjust skeleton in Maya using Translate Tool. If using Rotate tool is unavoidable remember to Freeze Transformations prior to using the model in Motionbuilder. Alternatively you can adjust the shoulders using their Control Effectors in an Additive Animation layer after you've plotted the motion onto a Control Rig
** If your model has a skeleton that does not follow Motionbuilder naming convention, the automatic characterization will not happen. You can use Character Definition to Alt+Drag and Drop (x+Drag and Drop for maya controls) individual bones into appropriate areas. Then click on Create Control Rig to finish Characterization process.
*** Skeletons downloaded from Autodesk Character generator have Neck and Neck 1 joint. If using the standard Vicon skeleton as a mocap source remove the Neck and Neck 1 joints in the target skeleton. To do that switch to the Character Definition tab and uncheck Characterize. Then delete Neck 1 and Neck 2 from their slots. Check Characterize again. Note that all the Character Settings (ie Reach, Offset etc) may get reset to default as a result of this operation.
Cleaning Skeletal Data in Motionbuilder
1. Select the Hips node of your Mocap character. Right click/Select Branches.
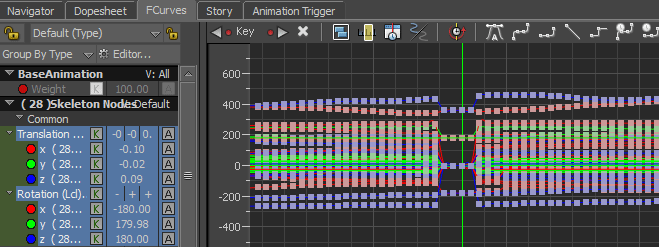
2. Open F-Curves editor and select Translation and Rotation channels. **Only the Hips node has translation values, all other joints in the skeleton only rotate.
3. Playback or scrub through the take to look for brief (>1/5 second) when markers and skeleton disappear. This may happen if the performer is moving very fast and is close to the edge of the capture volume. In F-Curve window this will look like the picture below. To fix the problem select the frames with zero values and delete them.
4. Without deselecting the joints, run Butterworth filter (the default setting of 7 Hz is fine).
5. Now look for flickers and twists on joints at the end of hierachy chains: head, hands, toe bases and feet. If you notice brief twists where the joint is in the same or similar position before and after the problem area, you can select the corresponding frames and delete them. Experiment with flat or spline tangents for the beginning and end frame of the gap to get the desired movement quality.
Most of the time you will probably need to work with joints further up the chain (ie Forearm) to fix the compound rotation problem. If the twist lasts for a long period of time and the movement is complex, Plot the character to the Control Rig and use IK and FK effectors to animate over the problematic areas. Use Additive Animation layer to add expressiveness and change pose while preserving the timing of motion. Use Override Layer to replace animation. Key the Override Layer Weight to control its influence (as oppose to using Zero keys in Additive layers). Note that if you have accidentally keyframed a control effector in an Override layer and then removed the keys, you may still experience undesirable movement in the control effector. You may have to key IK Blend and Pull values the for the Effector in question to fix the problem.
To add more takes to the same character or other characters in your scene:
Merge motion data from another file. Do not choose the Apply Namespace option. If you did use different namespace for your motion data, make sure you use the same Namespace for additional imports of data for the same peformer. If you want to add takes to multiple characters in your scene make sure you use the Namespace that matches the respective character/skeleton.