Building Sequences in Motionbuilder Story Window.
1. While you can import clips on Character that has a motion take already associated with it... it's really best to have a clean characterized skeleton or skeleton with a control rig with no motion. To accomplish that uncheck "active" in your Character Settings to return it to the default T-pose and save file. In the Save window uncheck all takes.
2. To start importing motion clips for building a sequence re-open the file you just saved (Model with a Control Rig, Skeleton, in a T-pose). You can right click in the Asset Browser and select Add Favorite path to add the folder containing motion clips. You can then import the clips by dragging and dropping them either onto the Character hips or into the story window. Alternatively you can add a Character Animation Track in the Story panel, select the correct Character in the pull-down menu, right click and select Insert Animation File(s) to select it directly.
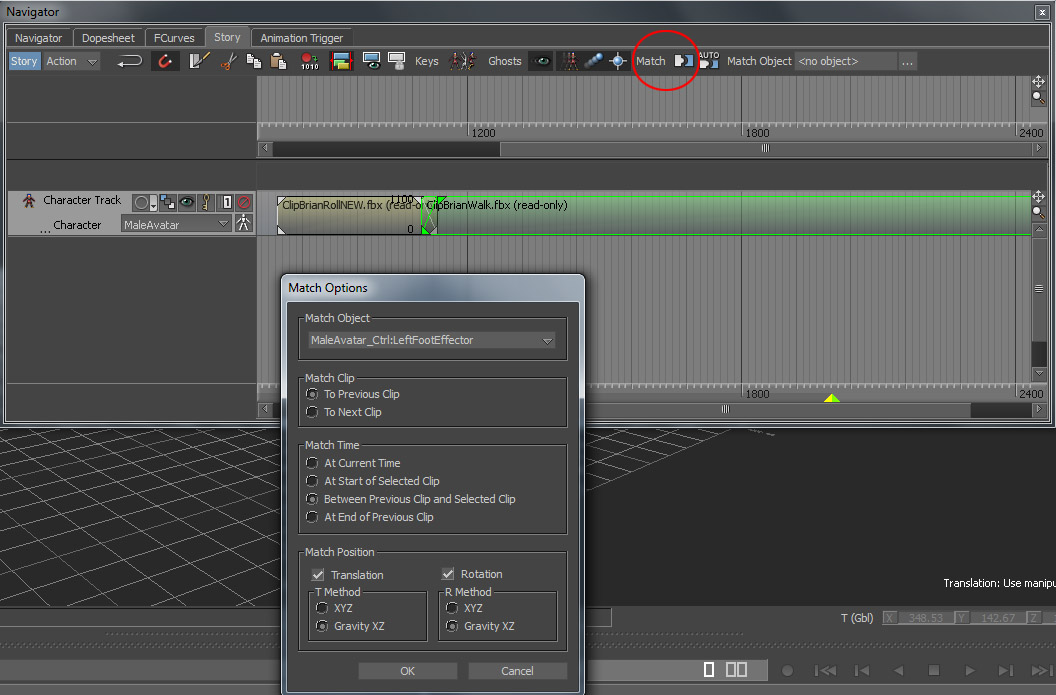
3. To procedurally blend between the imported clips, align them in the desired order. For realistic blending it is best if the clips in a sequence end and start on the same foot. Click Match and pick the desired Control Effector relative to which the blend will be solved.
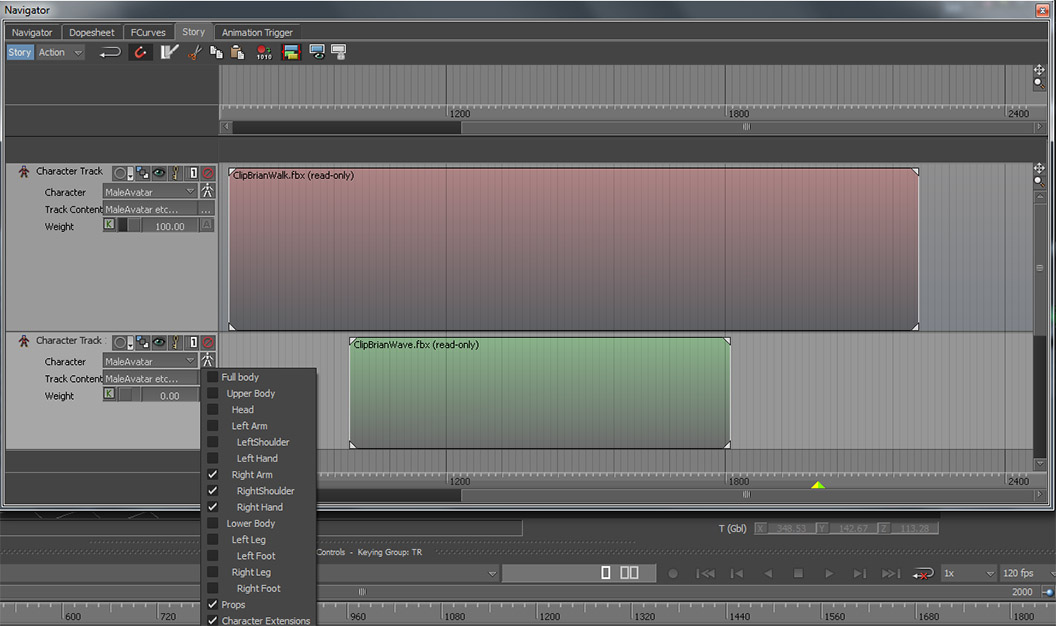
4. To blend only part of another clip's movement into the main clip, ie waving the hand while walking, insert the main movement clip, ie Walk, in the first Character Animation Track. Then create another Character Animation Track underneath the first one. EXPAND THE TRACK DOWN TO SEE ALL OPTIONS. Click on the Figure Icon to select the body parts you want to effect by the Wave clip, ie shoulder and arm. Uncheck Full Body and check only the parts that you want to channel the clip into. See image below. Animate the Weight of the track to control blending.
5. If you want to edit the transitions between clips more elaborately in addition to procedural blending, you need to plot the motion consisting of multiple clips onto a Control Rig.
If you have used a Character with a Control Rig to blend clips, right click on the Character Track and choose Process Track to New Clip. Then select the Processing Result Clip, right click and Plot Whole Scene to Current Take. You can then delete all character tracks and return to working with the Control Rig and Animation Layers.
If you used a Character with Skeleton and T-pose only (no Control Rig): Go to Character asset in Navigator, double click it and choose Plot in Settings.
IMPORTANT: After creating the new control rig delete the character track and all the clips in the Story Window. Only then it will be possible to create new keyframes on the control rig.
Story Window introduction (Digital Tutors)
Blending clips in Story Window (Digital Tutors)
Matching in Story Window (Digital Tutors)
Special Cases:
Creating Motion Loops tutorial from mocappys (ie continous walk cycle)
Reversing animation is possible only with the use of TimeWarp Curve.
To reverse animation of a motion clip in a story, select the desired clip, then go to the Properties Panel and check the Reverse option.To customize the timing of individual body parts:
1. Select Skeleton or Control Rig (Select Branches if want the effect to be applied to the whole body)
2. In FCurves enable TimeWarp. Create a new timewarp.
3.
With target body parts selected, select desired channels (rotation, translation) on left.
4. Apply TimeWarp.
5. Move the Timewarp keyframes in FCurves editor to observe the effect. Ie, switch places for the first and last keyframes to reverse time.
Please read the MocapMotionEditing.pdf in the Reading Materials folder to get some ideas for improving your motion edits.