11/07/17
Optimizing a Scanned Model
Reconstruction and Cleanup Options in Zephyr:
1. After reconstructing the model using default settings examine it to check for holes, extra protrusions from the surface or uneven surface. You can attempt another round of reconstruction using Advanced/Highest quality/Exhaustive settings at each step. Please read Zephyr documentation and Tutorials for guidance.
2. Holes: work with Tools/Mesh Filters/Fill Holes to close holes in the model. This may not alway result in a desirable surface flow. Experiment with deleting "islands" and "debri" of polygons using the point selection and deletion tool in the upper right part of the interface.
3. Extra Protrusions and Islands of polygons:
Option A: Select and delete the undesirable voxels in the Dense Cloud using point selection and deletion tools. Don't forget about the Select by Color option
Option B: Select and delete undesirable polygons in the reconstructed mesh and fill holes.
4. Wavy or uneven surface: reconstruct mesh of medium or lower resolution, experiment with Tools/Mesh/Smoothing Filters. Ie Retopologize and then run the model through the Bilateral Smoother with default settings. Do these steps before generating Textured Mesh or redo the Textured Mesh generation after these steps if you've had done it earlier.
Merging Workspaces
It is possible to combine multiple sets of scans in order to reconstruct the entire object.
 |
 |
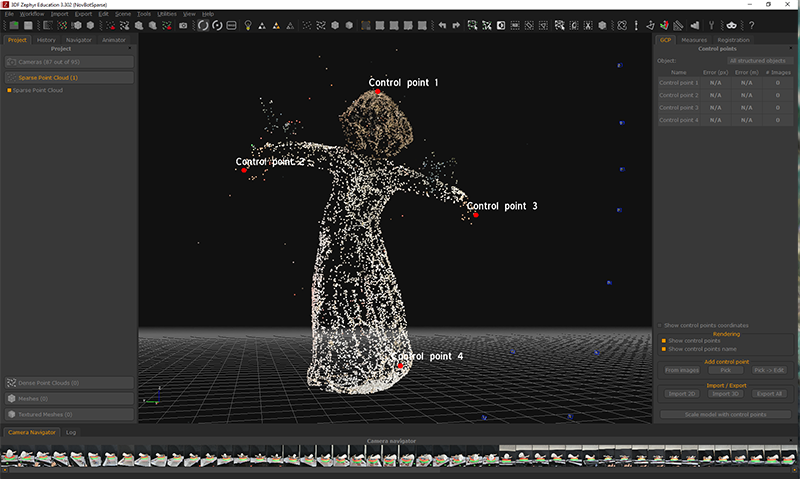
Insert CONTROL POINTS at strategic locations of the first object's Sparce Cloud
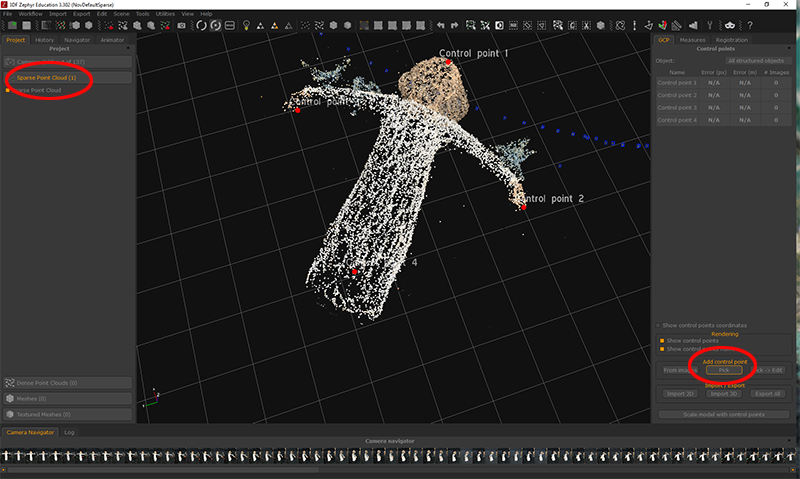
Insert CONTROL POINTS at strategic locations of the second object's Sparce Cloud. The orientation of the workspace doesn't matter.
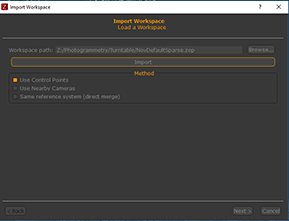
Using Merge Workspace operation import the first object's file/ sparse cloud.
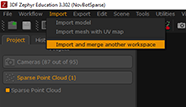
Click Import, specify Control Points, then click Next.
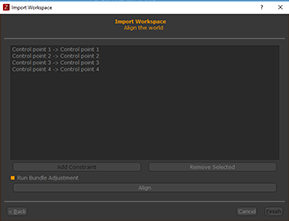
If the combined sparse cloud looks correct, proceed with the usual steps that follow.
11/09/17
Example Goals for Retopology:
- reducing polygon count
- restructuring surface for further sculpting or better rendering (change default triangulation into quads)
- restructuring surface to establish edge flows that make the model better deform for animation
1. Import the model into Maya and examine it.
a. select and delete extra faces;
b. select all vertices and Merge with Threshold setting at 0.01 to make sure there are no unmerged shells;
c. Mesh/Cleanup and Delete History;
d. Make a duplicate of the model;
e. Optional step: Fill Holes in Maya;
f. Send the model to Mudbox;
2. In Mudbox: Mesh/Patch to close up any holes. If you want to keep some surfaces open, use Borders Tool in Select/Move panel. Double click on a border edge (edge that surrounds an opening). Once the edges are highlighted, Patch operation will apply only to this area.
3. Mesh/Retopologize*. If your goal is to reduce the polycount, specify the Base Count accordingly. This will create 3-5 subdivision levels. The base level will be the low-rez version of your model, the top level should closely match the original model. You can pick the level to continue working with depending on your modeling goals. Note that retopologizing deletes all previously laid out UVs and you will no longer see the color map on your model.
* Use Curve Tools to mark the desired edge flow for a more controlled retopology process.
4.Generate UVs in Mudbox OR send the model of desired resolution back to Maya and create UVs using Automatic Mapping. If needed, create custom UV layout.
Alternatively use Mudbox automatic UV layout.
5. Use the original mesh (with unfilled holes) to transfer color onto your newly retopologized model.
a. Align your new model to overlap the original mesh as close as possible.
b. Switch to Render menu set. Choose Lighting/Transfer Maps. Specify the items circled in red. Make sure that the Envelope covers both meshes completely. After you Bake all the color map should appear on your new model. The filled faces will not have appropriate color. You'll need to send the model back to Mudbox to edit those spots. If your UV layout is intuitive you can do this in Photoshop.
6. In Mudbox, you can use original photogrammetry photos as stencils for sculpting and painting details on the model. In Paint Tools select Projection Brush. In Stencils add selected photographs as stencils. Pick them from the Stencils menu after they've been added. Using combination of S key and mouse buttons adjust the size, position and orientation of the stencil. Then using Projection Brush paint different sides of the model that correspond with respective photos.
Pluralsight: Retopology Techniques in Mudbox
Retopologizing in Maya with Quad Tool and Curve Based Modeling
Sometimes retopologizing in Mudbox using curves still does not give you a clean edge flow. This may call for manual retopologization in Maya using Quad Tool. This is essentially building the model from scratch with a scanned 3d model as reference.
Pluralsight: Retopology Techniques in Maya