NURBS Curves
Pluralsight: Exploring NURBS in Maya
Y:\Courses\2017-2018\AC7001_VitaAU17\Resources\NURBS\NURBStheory.pdf
Definition
NURBS: non uniform rational b-splines
The term NURBS refers to curves and surfaces generated from the position of points. A NURBS curve is generated from a series of control points and a NURBS surface is generated from a series of curves. Each NURBS curve or surface has a specific parametric equation that defines its shape and is always a four-sided patch. It can be shaped to take on various forms, but it always remains four-sided. NURBS objects can be defined by up to four contour or any number of profile curves.
Because NURBS surfaces are parameterized, it is easy to assign a coordinate space to a four-sided patch. Their UV space is also parameterized.
NURBS are used for objects with simple and precise curvalinear surface shape. This format is most common in architecture, industrial and product design where the accuracy of form and adherence to blueprints are most important. In the past (and more rarely today) NURBS were used in animation production to control surface smoothness. NURBS are never used as a model format in game design but can be very effective as a stage of a modeling process.
1. In animation production NURBS can be used for the models with many simple precisely shaped elements: a bird cage, a baby crib, a sail ship with masts, sails and ropes.(See NURBScage.mb in Resources/models) NURBS can also be used for making large continuous surfaces, such as fields and terrains, fabric (curtains, simple fabric shape (not true cloth simulation), etc. Older cg workflows for organic-looking smooth complex surfaces, made out of multiple patches. http://www.npowersoftware.com/nurbs/pntutorials_advanced_Car.htm Also see NURBShead.mb model in Resources/Models.
2. In automotive, industrial or product design NURBS patches are used for making high-precision models based on blueprints.
3. Procedural models (Rhino and Houdini based) used mostly in architecture, interior design and information visualization/aesthetics.
NURBS Curve
- starts and ends on a control point
- has direction
- is parameterized
- must have at least four control vertices.
Anatomy of a NURBS Curve:
Control Vertex (Vertices) –points that lie outside the curve, allow for manipulation with continuity/smoothness
Edit Point(s) – knots (little crosses) that lie on the curve, allow for manipulation with precision
Control Points - points placed on the curve by the user, in order to specify location on the curve (for the purpose of inserting knots, cutting or detaching the curve, etc)
Hull(s) - a line that connects Control Vertices, effect the entire range of the curve
Making Curves with NURBS Curve Tools:
1. CV curve tool – place Control Vertices , Edit Points will be created accordingly.
2. EP curves – create Edit Points, Control Vertices will be created automatically.
3. Pencil Tool- Edit Points are created automatically as you draw the curve.
4. Arc Tools.
5. Create NURBS/ Circle and Square.
Editing Curves:
- Creating sharp angles in a cubic curve is possible by overlapping consecutive CVs or creating a 1 degree curve and a 3 degree curve and attaching them
- Attaching and Detaching Curve
- Aligning Curve
- Reversing Curve Direction
- Opening and Closing Curves
- Inserting Knots
- Rebuilding Curve
- Duplicating Surface Curve (from NURBS or Polygon surface)
Drawing Curves on 3d surfaces:
Modify/Make Live
Project Curve on Surface
Generating Curves from Motion - Animation/Visualize Menu - Akotori Goto works
Curves are used in animation as motion paths
NURBS Surfaces
Anatomy of a NURBS Surface:
Control Vertices – can move, rotate and scale (Additional selecting by pressing arrow keys on the keyboard)
Hulls – can move, rotate and scale, effect a row of CVs at a time
Surface Point- cannot transform, used for inserting isoparms
Surface Patch- cannot transform, can duplicate via Edit NURBS/Duplicate NURBS Patches
Isoparm – cannot transform, used for detaching surfaces, stiching edges, etc.
NURBS models smoothness display keyboard buttons:
1 – linear mode
3 – cubic mode these display modes effect only the way NURBS are displayed in viewports, NOT in renders
Creating simple NURBS models/patches:
1. Primitives
2. Revolve(editing curve vs editing model, getting rid of a "pin cushion effect by inserting isoparms)
(see (WheelTutorial.pdf in Resources/NURBS folder)
3. Extrude
4. Loft for best results use cross sections (curves), with same direction and same number and approximate location of EPs (knots)). Achieve that by either copying and modifying the same curve, or Rebuilding Curve with Match Knots option. - cross section selection order; - curves direction; - open vs closed loft;
(see example PaintTube.mb file in Resources/NURBS folder)
5. Planar Surface
6. Extrude and Birail.
7. Boundary and Square.
8. Bevel and Bevel Plus.
9. Trimmed surfaces. Continuity: positional and tangent. Breaking tangent continuity.
When working with NURBS pay attention to CONSTRUCTION HISTORY
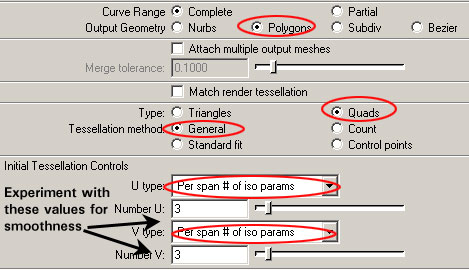
**Render quality for NURBS is controlled via Tesselation settings in Attribute Editor**
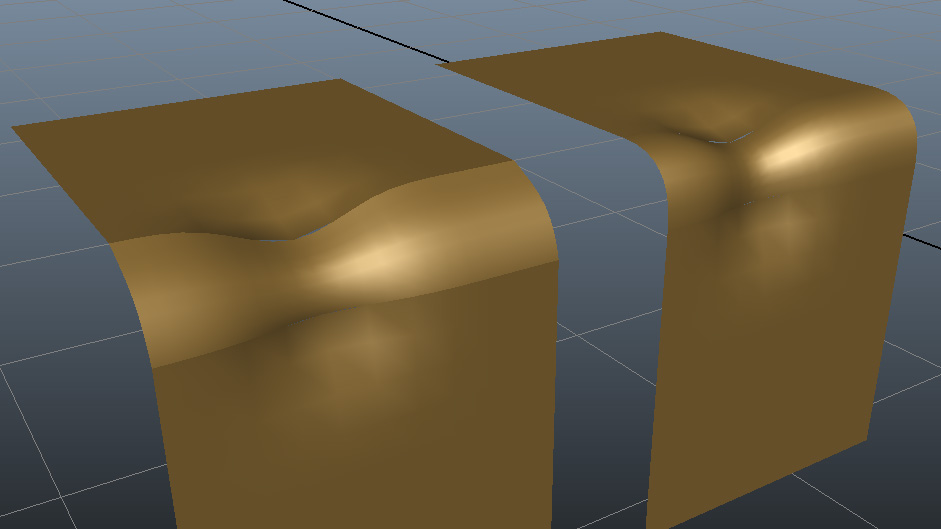
Positional and Tangential Continuity
Positional Continuity is established when the borders of adjacent NURBS patches line up, but the seam is noticeable.
Tangential Continuity is established when the borders of adjecent NURBS patches line up and there is no visible seam. This is achieved by ensuring same coodinate values on at least one of the axis on the first and second CV of each isoparm that runs perpendicular to the shared edge...
Using NURBS Curves and Surfaces to Make Polygon Objects
When building an object with NURBS curves it is possible to choose polygon output in the operation settings (ie rotate, loft, etc). It is also possible to convert an existing NURBS surface into polygonal surface using Modify/Convert/NURBS objects to Polygons. Depending on whether you want output a lo-res or a hi-res object work with these settings:
PUTTING IT ALL TOGETHER: Digital Tutors: Interpretive Modeling