
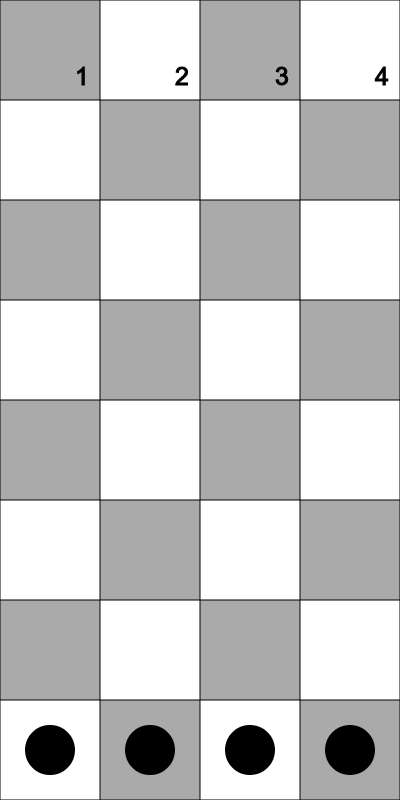
The Half Checkerboard Challenge is part of the San Diego Discrete Math Project Collaborative curriculum. This two player game involves a half checkerboard and four checkers like the image below:
Unlike the game of checkers where you only move diagonally, in the half checkerboard challenge you can only move the checkers downwards, and each turn you can choose to move 1, 2, 3 or all 4 checkers downwards. Once all four checkers are at the bottom of the checkerboard the game is over. The player that moves the last checker to the bottom of the checkerboard wins because the next player has no move left.
Later we will talk about strategies for winning the game. For now let's see if we can create a simple code to represent this game.
Click here to open up a one checker version of the game
Go ahead and press  in the top left to run the code. Then press 1 on the keyboard! Your program should look like this:
To save your work you need to create an account by clicking Sign Up in the top right corner of the screen. If you have already created an account, click "Log In" and put in your login information
A non-profit arts group called The Processing Foundation runs this site. They are nice people and they will not send you a bunch of emails for registering.
Before moving on, in the top left click click File --> Duplicate so that the code you are working with is on your account!
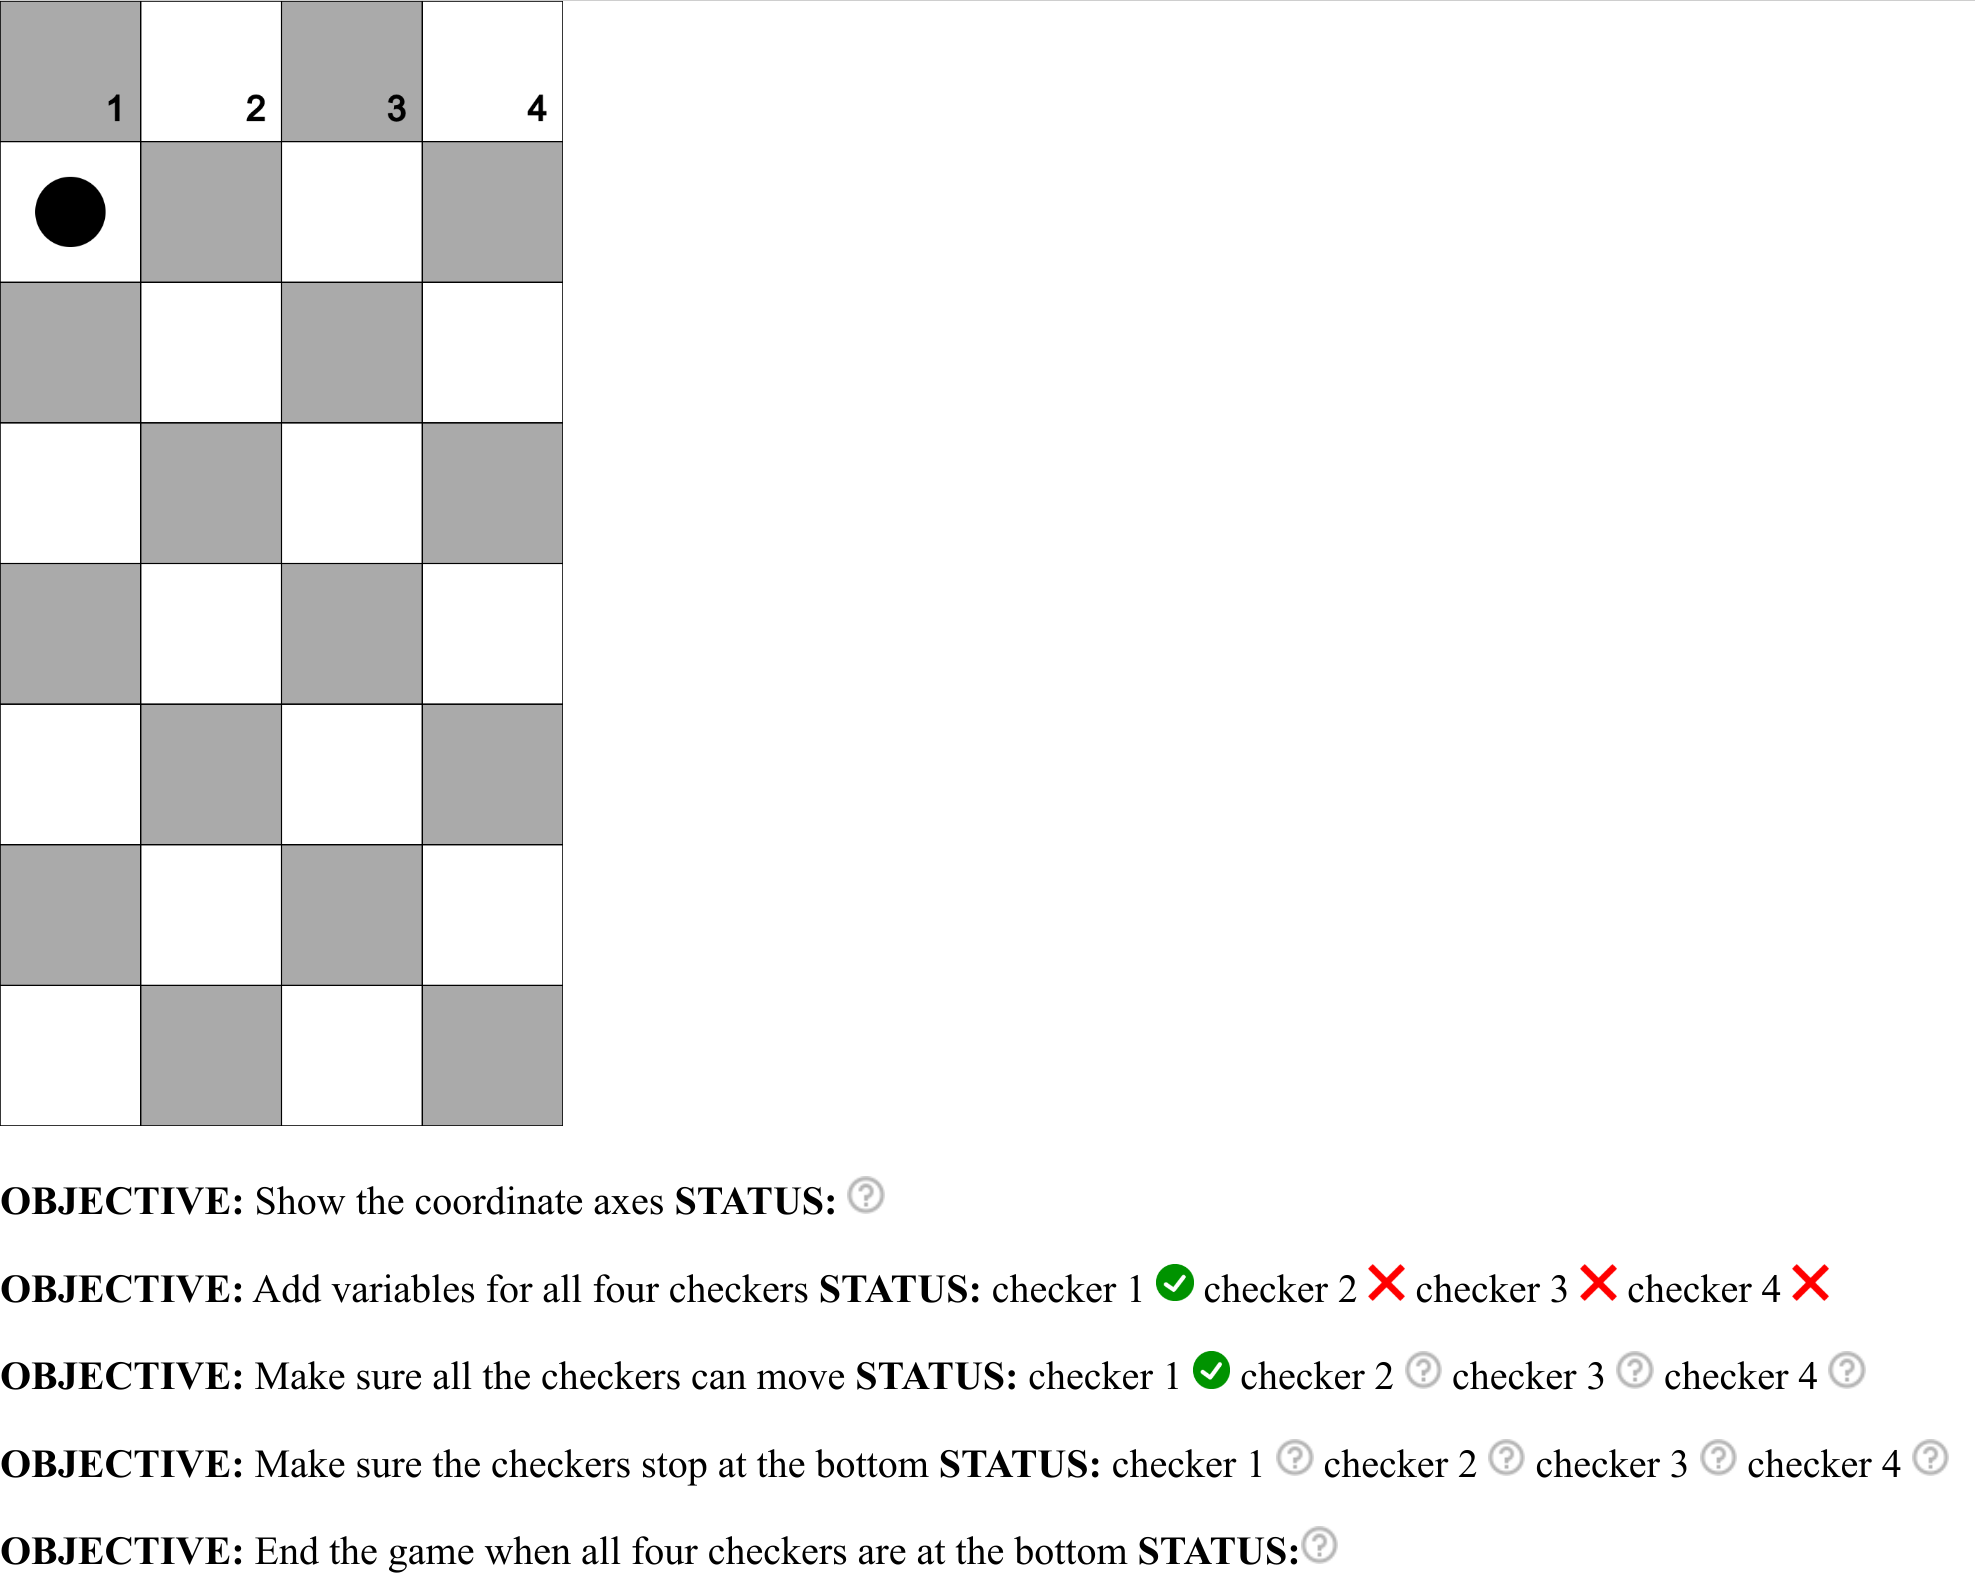
If the program can detect that something is wrong with your code it will show a red ![]() next to that objective.
next to that objective.
If the program can detect that you have completed the objective it will show a green check mark ![]() next to that objective.
next to that objective.
But the program is not very smart and if it can't tell whether you have completed the objective it will indicate a question mark like this ![]() next to that objective.
next to that objective.
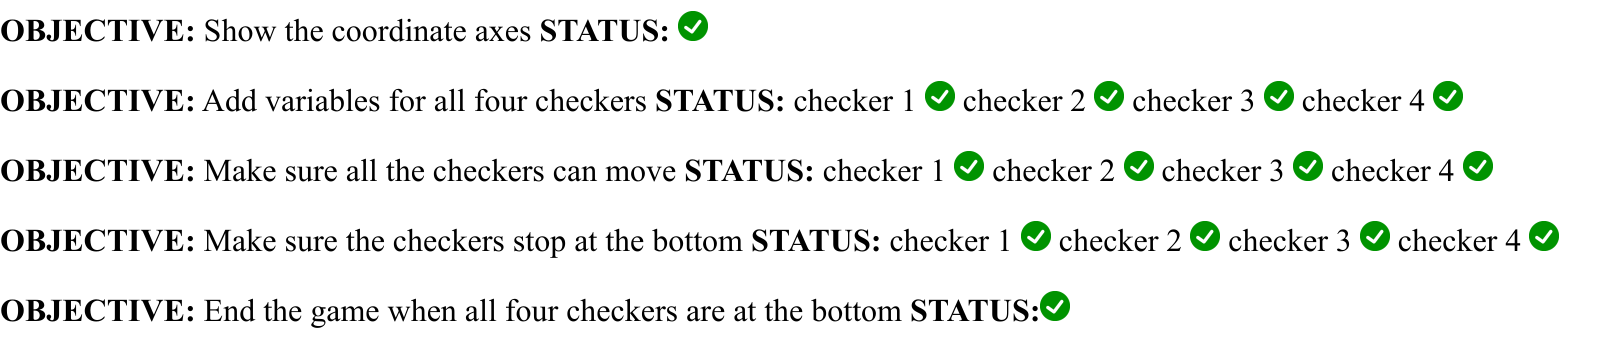
By the end of this activity your goal is to have green check marks next to all the objectives like this:
Important Note: You may need to zoom out to see the entire checkerboard. On most keyboards this can be done by pressing Control and minus at the same time.
Here is the entire program:
xchecker1 = 50;
ychecker1 = 50;

showaxes = false;

function draw(){

  clearscreen(255,255,255); // white background
  display(); // draw checkerboard

  if ((keyIsPressed == true) && (key == 1)) ychecker1 += 100;

  // add code below to make sure the checkers stop at the bottom

  // add code below to end the game

  fill(0,0,0); // rgb 0,0,0 means black
  circle(xchecker1,ychecker1,50);

} // end draw() DO NOT ADD ANY CODE AFTER THIS LINE!!!
There are a couple of things to note at this point:
1. The code at the very beginning before function draw() only gets run once and it is run at the beginning of the code. For example, this code:
xchecker1 = 50;
ychecker1 = 50;
is how we set the initial x and y position of the first checker. Later we will add variables in this section to set the initial positions of the other three checkers.
2. The code within the curly brackets {} of function draw() gets run over and over (and over) again. This is helpful because we want the screen to change as different things happen in the game.
3. Anything after // is a comment. Comments are only to help people reading the code understand what is going on. The computer doesn't do anything with the comments. In the program there are comments that label what different parts of the code are doing. There are also comments that you will use later to know where to put in code.
4. The command that draws the checker is this:
circle(xchecker1,ychecker1,50);
The variables xchecker1 and ychecker1 correspond to the x and y position of the checker. The value 50 is the diameter of the circle.
Remove things from the program and see what happens!
After you remove each thing, press to see what the effect is. Then press Control + Z to "undo" those changes so the code you removed will reappear.
Here are some things you should experiment with:
fill(0,0,0);?
circle(xchecker1,ychecker1,50);?
if (keyIsPressed == true && key == 1) ychecker1 += 100;?
There is code at the beginning of the program:
showaxes = false;
Change this to:
showaxes = true;
This will highlight the coordinate axes we are using in this program. Your program should behave like this
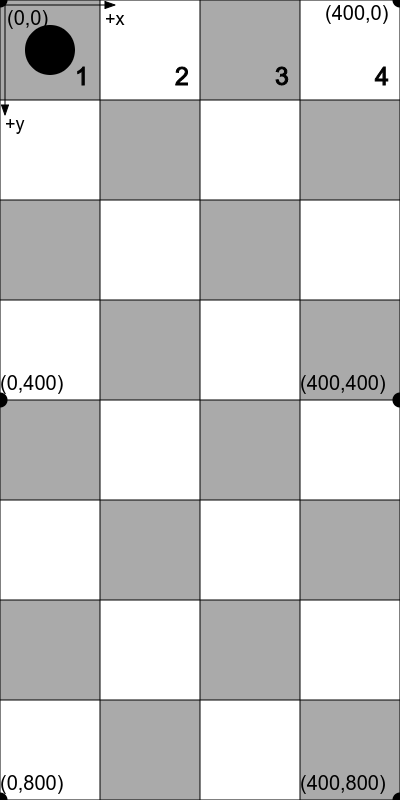
Compare and contrast what you see here to a typical coordinate axes that you would see in math class
If you want to you can change the color of the checker by changing fill(0,0,0); to something else. The three numbers there are for red, green and blue. Choose a number between 0 and 255.
For example, this fill command will turn things blue:
fill(0,0,255);
You can also change the background color by changing this line of code:
clearscreen(255,255,255); // white background
to this:
clearscreen(0,255,0);
If you make these changes you should get a blue checker on a green checkerboard
To pick out your own rgb colors a helpful thing to do is to go to google and search on "color picker" Pick whatever colors you want. Have fun!
In the half checkerboard challenge there are not one but four checkers. Our program only has one checker so far.
This will involve making the following changes to your code:
1. Add variables to the beginning of the code for the other checkers
Specifically you need to define xchecker2, ychecker2, xchecker3, ychecker3, xchecker4 and ychecker4 at the beginning of your code similar to how xchecker1 and ychecker1 are defined like this:
xchecker1 = 50;
ychecker1 = 50;
Your job is to select the other variables so that the three other checkers have the correct starting position.
2. Add circles for checker 2, 3 and 4
Towards the end of the code there is this line:
circle(xchecker1,ychecker1,50);
You need to add three more lines of code like this so all four checkers appear on screen
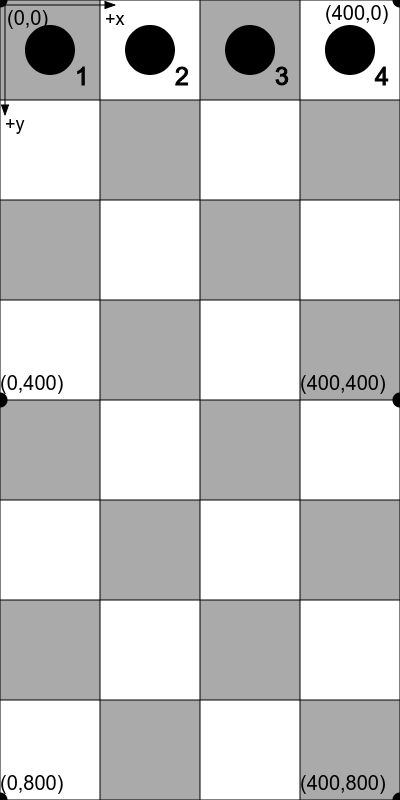
At this point your program should behave like this
3. Make sure all the checkers can move!
An important part of the game is making sure all four checkers can move. The following code causes the first checker to move when the "1" key is pressed on the keyboard:
if ((keyIsPressed == true) && (key == 1)) ychecker1 += 100;
Do not modify this line of code! Instead, add another line of code below it and change the numbers so that it is for the 2nd checker. Then do this again for the 3rd and 4th checker.
Ultimately, your program should behave like this
Note: You can set showaxes = false; now or you can leave it as showaxes = true; It is up to you!
In the next step we are going to add some code to end the game when all four checkers are at the bottom of the screen.
There are many different ways to use if statements in your code. The following are some examples of if statements that are a mixture of words and code.
Example #1
  if ( time left before school begins < 10 minutes ) {
    print("Go to school");
  }
This is a pretty simple example. If the time left before school begins is less than 10 minutes then you'd better go to school.
But there are situations when the time left before school begins is less than 10 minutes but you shouldn't go to school...
Example #2
  if ( (time left before school begins < 10 minutes) && (weekday == true) ) {
     print("Go to school");
  }
With this if statement we are using && which is a symbol that means "and". So the if statement above means that if the time left before school begins is less than 10 minutes and it is a weekday then go to school.
The && symbol actually appears earlier in our program in this line of code:
if ((keyIsPressed == true) && (key == 1)) ychecker1 += 100;
This code means: if a key is pressed and that key is 1 then change the y position of checker 1 by 100
Example #3
Let's make our if statement a little bit more complex. After all, there are situations when it is a weekday and the time left before school begins is less than 10 minutes but you shouldn't go to school...
  if ( (time left before school begins < 10 minutes) && (weekday == true) && (issummer == false)) {
    print("Go to school");
  }
Now we are using two & symbols in one if statement. The statement reads: if there is less than 10 minutes remaining before school starts and it is a weekday and it is not the summer time, then go to school.
You can use even more than two & symbols inside of an if statement if you need to. For example, go to school if the time remaining is short and a weekday and it is not summer and you are feeling well and it is not a pandemic and it is not a snow day, etc.
Fun fact: When there is only one instruction for the "then" part of the if statement you don't need curly brackets {}. For example this code:
  if ( time left before school begins < 10 minutes ) {
    print("Go to school");
  }
is equivalent to this code:
if ( time left before school begins < 10 minutes ) print("Go to school");
This code only takes up one line instead of three. That is the only difference.
When there is more than one instruction for the "then" part of the if statement, this does not work and you do have to use the curly brackets {}
You may have noticed that this part of the code already uses the approach without curly brackets:
if ((keyIsPressed == true) && (key == 1)) ychecker1 += 100;
The choice not to use curly brackets here was simply to make the program a little bit shorter and easier to read.
If you run the program at the end of Step 3 you may notice that the checkers can go below the bottom of the screen if you keep pressing the number keys. This is not how the game is supposed to work. We need all four checkers to stay at the bottom of the screen even if the user keeps pressing the arrow keys.
There is a comment in the code that suggests a place to add code to prevent this from happening:
// add code below to make sure the checkers stop at the bottom
You will need to add multiple lines of code to make sure all four checkers stop at the bottom of the screen. Here is a hint for the if statement for the first checker:
if ( ychecker1 ><==? ???? ) ychecker1 = ????;
Your job is to figure out whether you should use a greater than (>), greater than or equals (>=), less than (<), less than or equals (<=), or equals (==) in that place and what numbers should be used in place of the ????
Try to make your code behave like this. If you press 1, 2, 3 and 4 repeatedly eventually all your checkers will end up at the bottom like this:
Feel free to experiment with different possibilities for the if statement! There is no penalty for guessing!
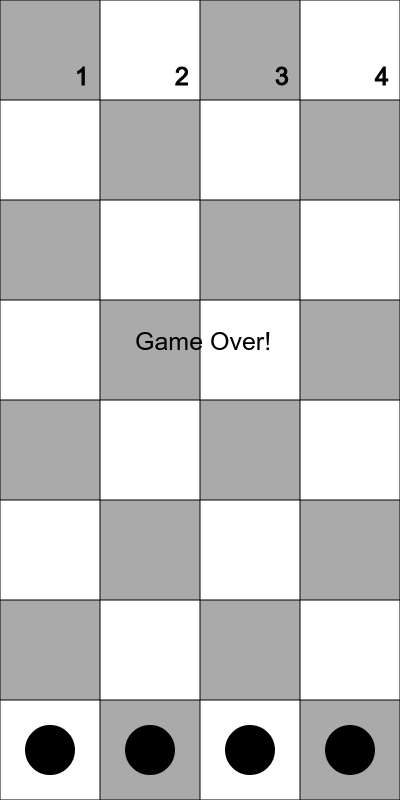
Now we need to make sure the program ends when all four of the checkers are at the bottom of the screen.
There is a comment in the code that suggests a place to do this:
// add code below to end the game
Here is some code that you can add below that comment to make the game end:
  if ( ???????????????????????????? ) {
    fill(0,0,0); // rgb 0,0,0 means black
    drawText('Game Over!',135,350);
    exit();
  }
Your job is to figure out what to put in place of the ??????????????? to get the game to end correctly when all four checkers are at the bottom like in this example
Question: Below is THE WRONG CODE to end the game:
  if ( ychecker1 = ychecker2 = ychecker3 = ychecker4 = 600 ) {
    fill(0,0,0); // rgb 0,0,0 means black
    drawText('Game Over!',135,350);
    exit();
  }
What happens when you put this in the program? What is wrong with this code that makes it not end the game correctly?
At this point you should have all green check marks! Yay!
Now you should have a working half checkerboard challenge. It is important to play the game with a friend to start thinking about what the optimal strategy might be.
To make the game more interesting, the players are supposed to put down the checkers at random y positions at the beginning of the game like in this example
The code behind the example uses the random function.
As you experiment with using the random function, push in the top left corner to see the different values that the random function will produce.
There are four different ways to use the random function:
Example #1. random()
ychecker1 = random();
print(ychecker1); // write the value to screen
The code above will give ychecker1 a random DECIMAL NUMBER between 0 and 1. This is not so useful because ychecker1 needs to be some random integer between 0 and 800, but you could use random() in combination with other operations (addition, subtraction, multiplication, etc.) to get something that does work like the example
Advice: Use ceil or floor Consider using ceil or floor to round decimal numbers up or down to the nearest integer.
ceil will always round up to the nearest integer, for example, ceil(9.03) will give the integer value 10
floor will always round down to the nearest integer, for example, floor(9.03) will give the integer value 9
Example #2. random(value)
ychecker1 = random(50);
print(ychecker1); // write the value to screen
The code above will give ychecker1 a random DECIMAL NUMBER between 0 and 50. This is not really what we want, but it could be modified or used with other operations (addition, subtraction, multiplication, ceil, floor, etc.) to get something that does work like the example
Example #3. random( minvalue, maxvalue)
ychecker1 = random(10,50);
print(ychecker1); // write the value to screen
The code above will give ychecker1 a random DECIMAL NUMBER between 10 and 50. This is not really what we want, but it could be modified or used with other operations (addition, subtraction, multiplication, ceil, floor, etc.) to get something that does work like the example
Example #4. random([arrayval1,arrayval2,arrayval3,...])
ychecker1 = random([1,2,4]);
print(ychecker1); // write the value to screen
The code above will randomly assign ychecker1 either the value 1, 2 or 4. This is not really what we want, but you could modify the expression and change the values 1,2 and 4 to something more useful. You can also add values. For example random([1,2,4,6,9]) would randomly select either 1,2,4,6 or 9.
As a reminder, the goal is to configure the program behave like this example
1. Complete Steps 1-7
Make sure your program behaves like it does at this link You should be able to get all green check marks by the end of Step 7. If you are having trouble ask another student or the teacher for advice.
2. Answer all the questions in questions.js
Getting the code to work is only part of the task of this activity. There are various reflection questions in questions.js that you should answer!
3. The Challenges
There are a few challenges in this activity including changing the colors in the program and giving the checkers a random initial position Ask your teacher if they want you to do any of the challenges If they say no you can still do them just for fun!
4. Submit your code
Submit your code to your teacher before the deadline so they can view it and give you feedback. Talk to your teacher if you are not sure how to do this.