So far we have been focusing on coding up the rules of the Half Checkerboard Challenge into our program. We have not really been focusing on strategies to win the game. Maybe you have already thought about the strategy -- that's great! Maybe you haven't thought about it at all -- that's fine too!
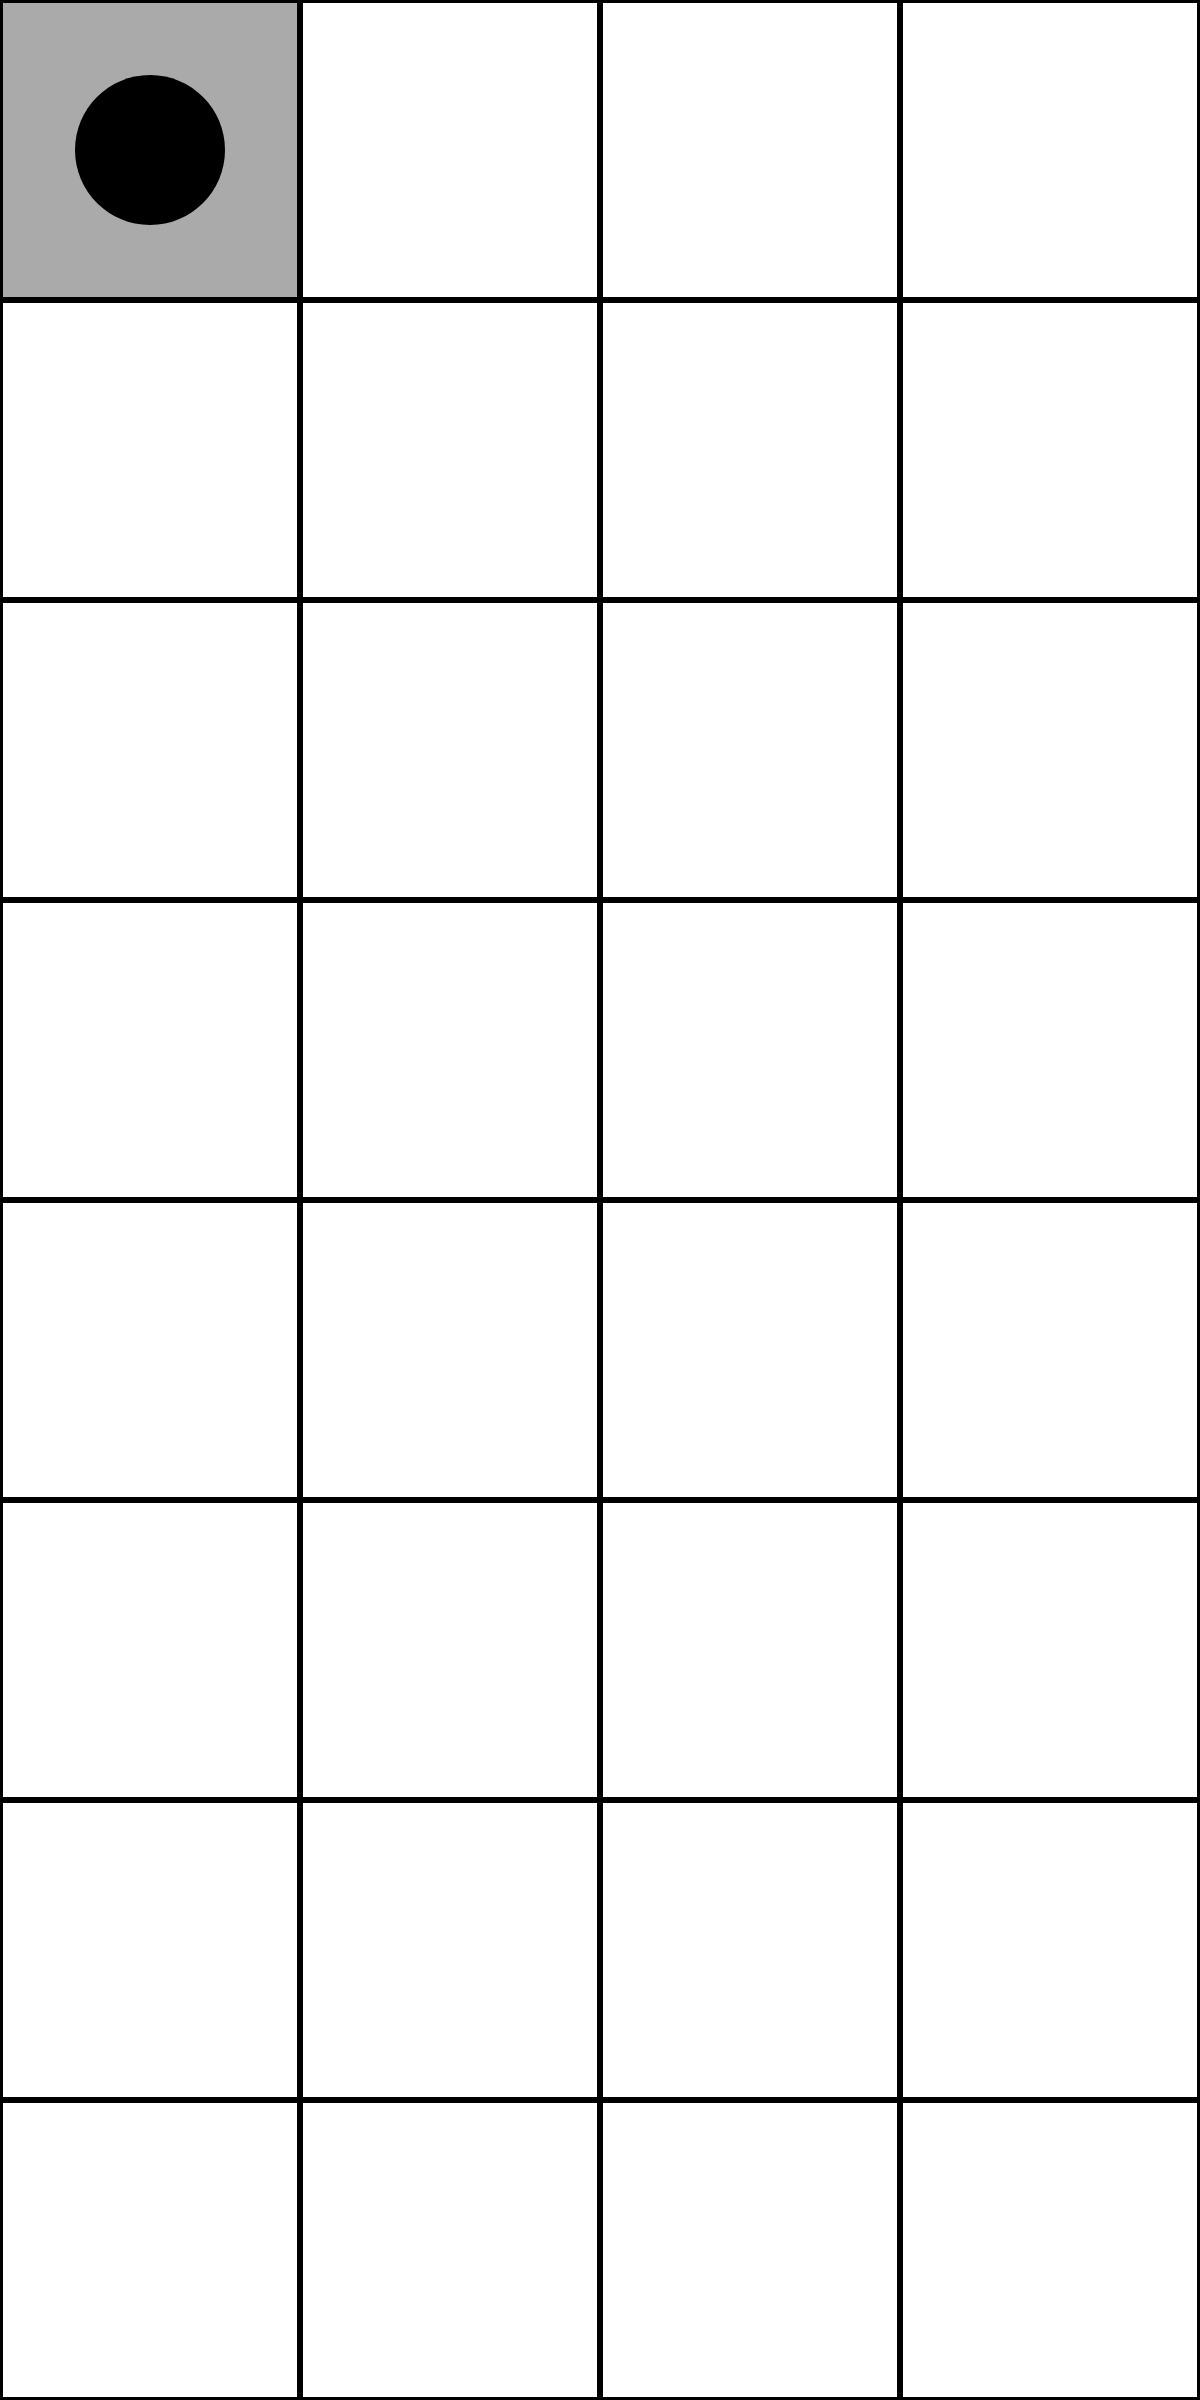
To highlight the optimum strategy we are going to keep it really simple and just do one checker like you see here:
It's totally possible to play the game with just one checker. The main thing is that the checker ends up on the bottom square at the end of your turn, and not your opponent (in which case you would lose).
In this activity we are going to change the checkerboard pattern to help the player see the optimum strategy a little better. We are also going to give the player some advice on whether to move the checker or whether to wait.
Click here to open up the code
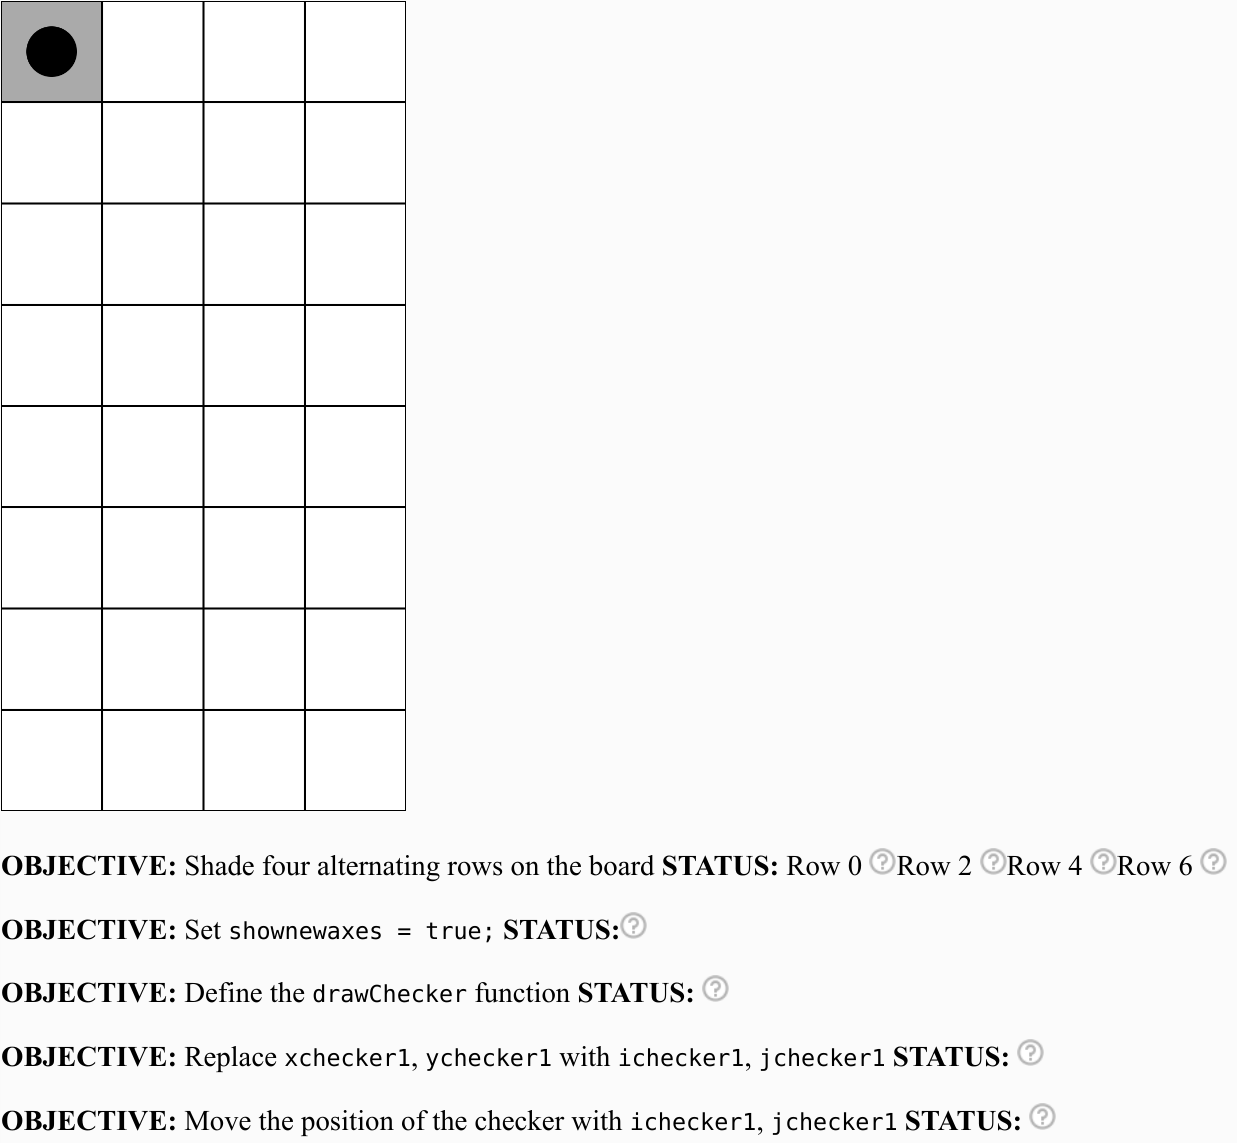
Go ahead and press  in the top left to run the code. Your program should look like this:
If the program can detect that something is wrong with your code it will show a red ![]() next to that objective.
next to that objective.
If the program can detect that you have completed the objective it will show a green check mark ![]() next to that objective.
next to that objective.
But the program is not very smart and if it can't tell whether you have completed the objective it will indicate a question mark like this ![]() next to that objective.
next to that objective.
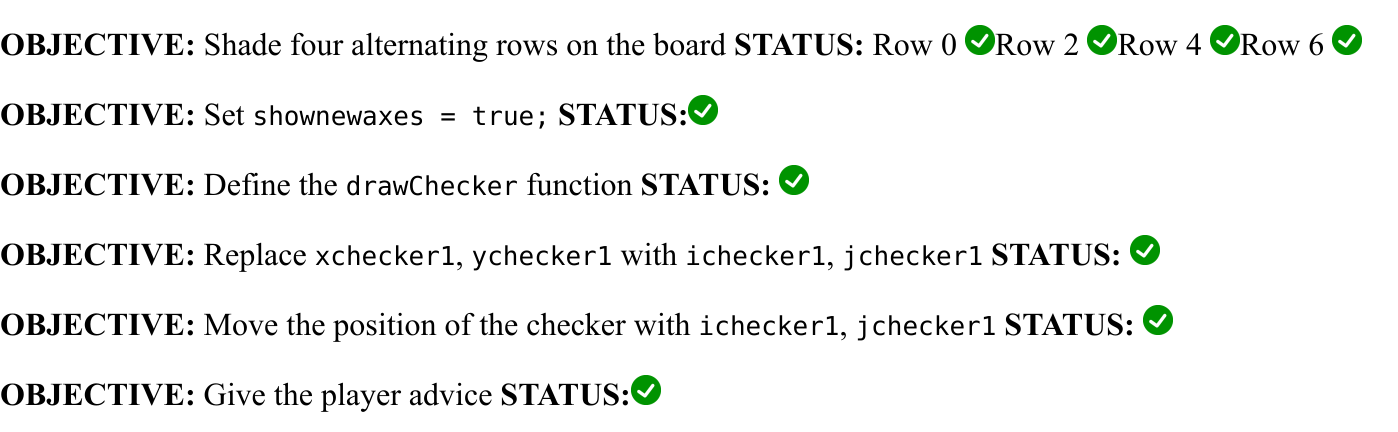
By the end of this activity your goal is to have green check marks next to all the objectives like this:
Important Note: You may need to zoom out to see the entire checkerboard. On most keyboards this can be done by pressing Control and minus at the same time.
Here is the entire program:
xchecker1 = 50;
ychecker1 = 50;

showaxes = false;
shownewaxes = false;

function draw(){

  clearscreen(255,255,255); // white background

  fill(170,170,170); // rgb 170,170,170 means gray
  drawQuad(0,0,0,100,100,100,100,0);

  // give the user advice here

  // draw the lines
  display();

  if ((keyIsPressed == true) && (key == 1)) ychecker1 += 100;

  fill(0,0,0); // rgb 0,0,0 means black
  circle(xchecker1,ychecker1,50);

}

// add new functions down here
The code above looks a lot like the beginning of Part 1 except for these lines:
  clearscreen(255,255,255); // white background

  fill(170,170,170); // rgb 170,170,170 means gray
  drawQuad(0,0,0,100,100,100,100,0);
The clearscreen(255,255,255); command really does two things. The first thing it does is clear the screen. For example, when you move the checker one square downwards you don't still see the checker in the spot where it started. This is because that screen was cleared.
The second thing that clearscreen(255,255,255); does is set the background to white. The numbers in the parentheses are the rgb color. rgb stands for red green blue. The min value is 0 and the max value is 255. White is all the colors (whereas black is no colors at all), so to get white you do max red, max green and max blue, which is 255,255,255
The next line line is a fill command that specifies the rgb color of what comes after.
The third line says "drawQuad" which is short for quadrilateral which is a fancy word for a four sided shape. For example, a rectangle and a trapezoid are both quadrilaterals.
Here is the "syntax" for the drawQuad command:
drawQuad(x1, y1, x2, y2, x3, y3, x4, y4)
Every quadrilateral has four points, so the command draws the shape from those four points.
Comment out the drawQuad command like this:
// drawQuad(0,0,0,100,100,100,100,0);
Now run the program. What happens?
Go ahead and uncomment the quad command (delete the // ) so it is like it was originally.
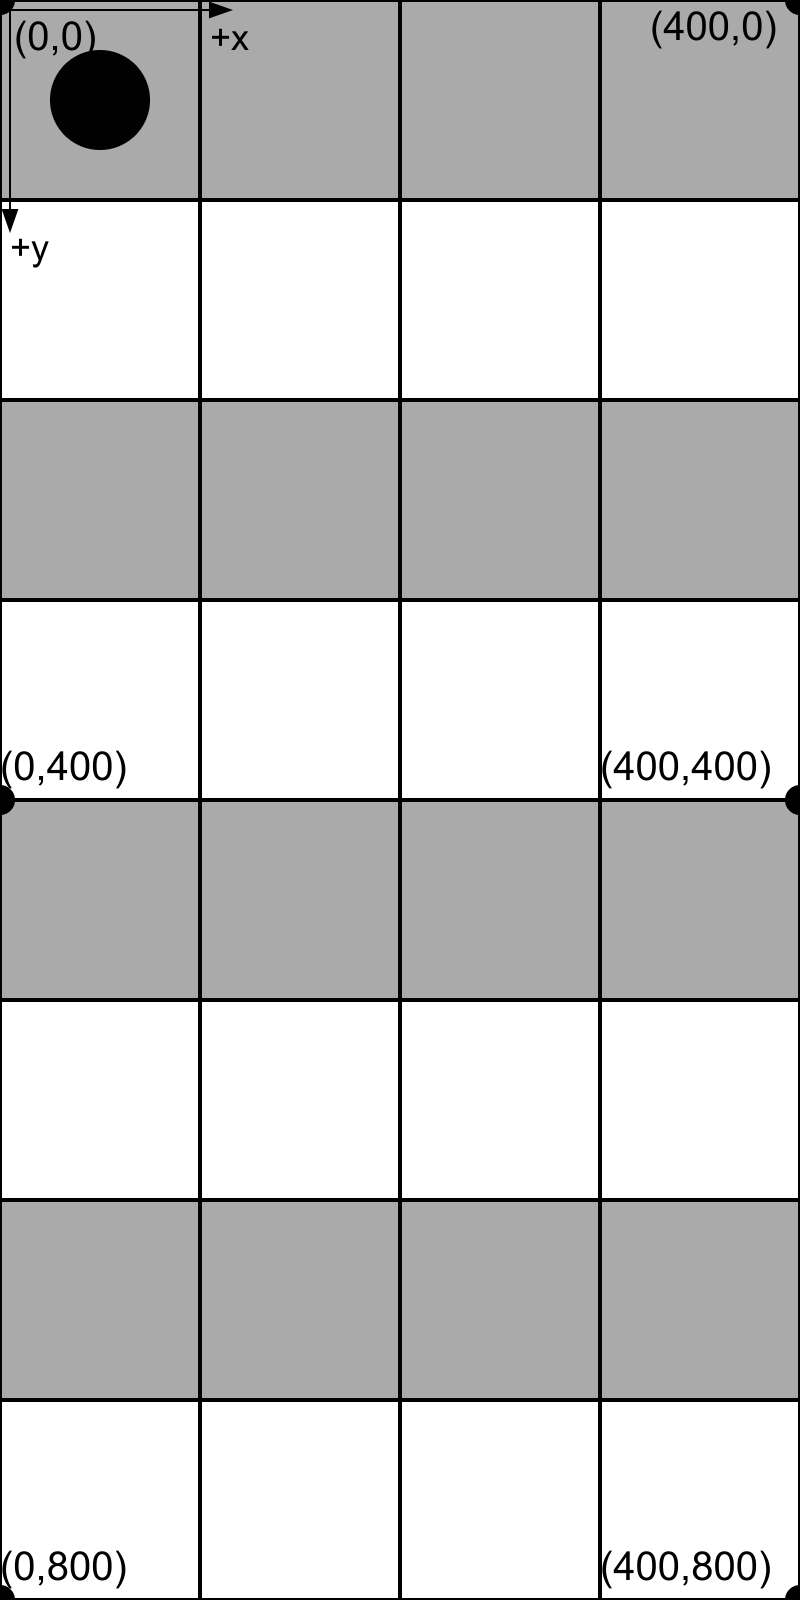
As in Part 1, we can turn on the coordinate axes.
Change this:
showaxes = false;
to this:
showaxes = true;
When you do this your program will behave like this
A key part of the strategy is paying attention to which row your checker is son and whether it is an odd numbered row or an even numbered row (more on that in a moment).
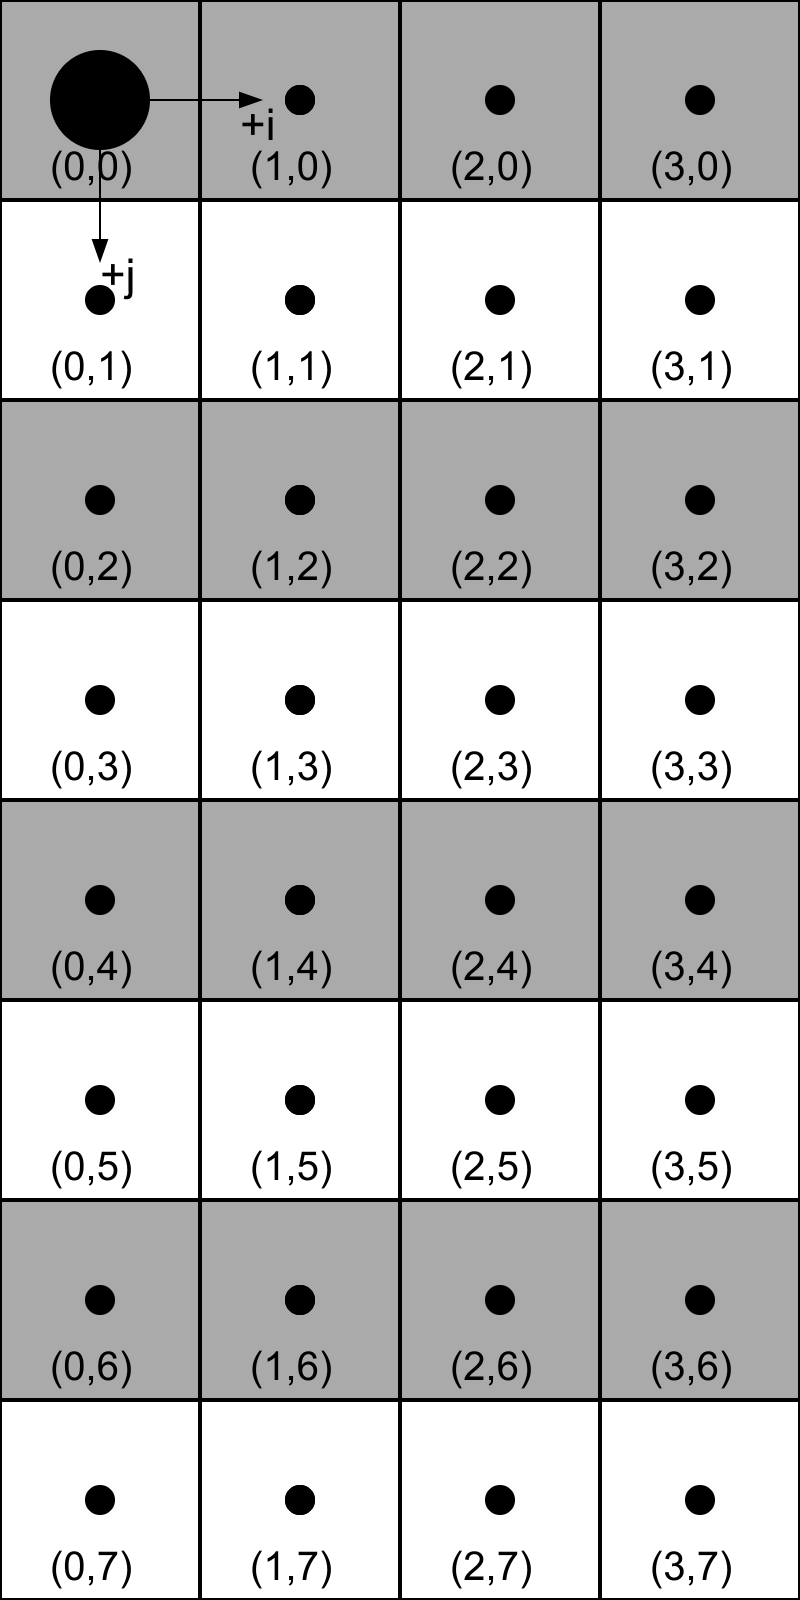
This being the case, the checkerboard pattern like we saw in Part 1 is not so useful. What would be more useful is to alternate between white and gray rows.
Modify and add quad commands so that your program behaves like this
Play around with the code and think about how to make sure that the checker ends up on the bottom square during your turn instead of the other player's turn.
You fill find that you always want your checker to be on a white square. The bottom square is a white square and if the opposing player moves the checker down into a gray square then you can move it back to a white square on your turn.
An important part of this strategy is that if the checker is on a white square already, THEN DON'T MOVE IT! Let the other player move it downwards to a gray square so you can move it down further into a white square on your turn.
We need to come up with a way to automatically figure out whether the checker is on a gray row or a white row.
Before we can do this it is helpful to define our own drawChecker function that uses a different coordinate system.
For clarity let's hide the axes for the old coordinate system by setting this back:
showaxes = false;
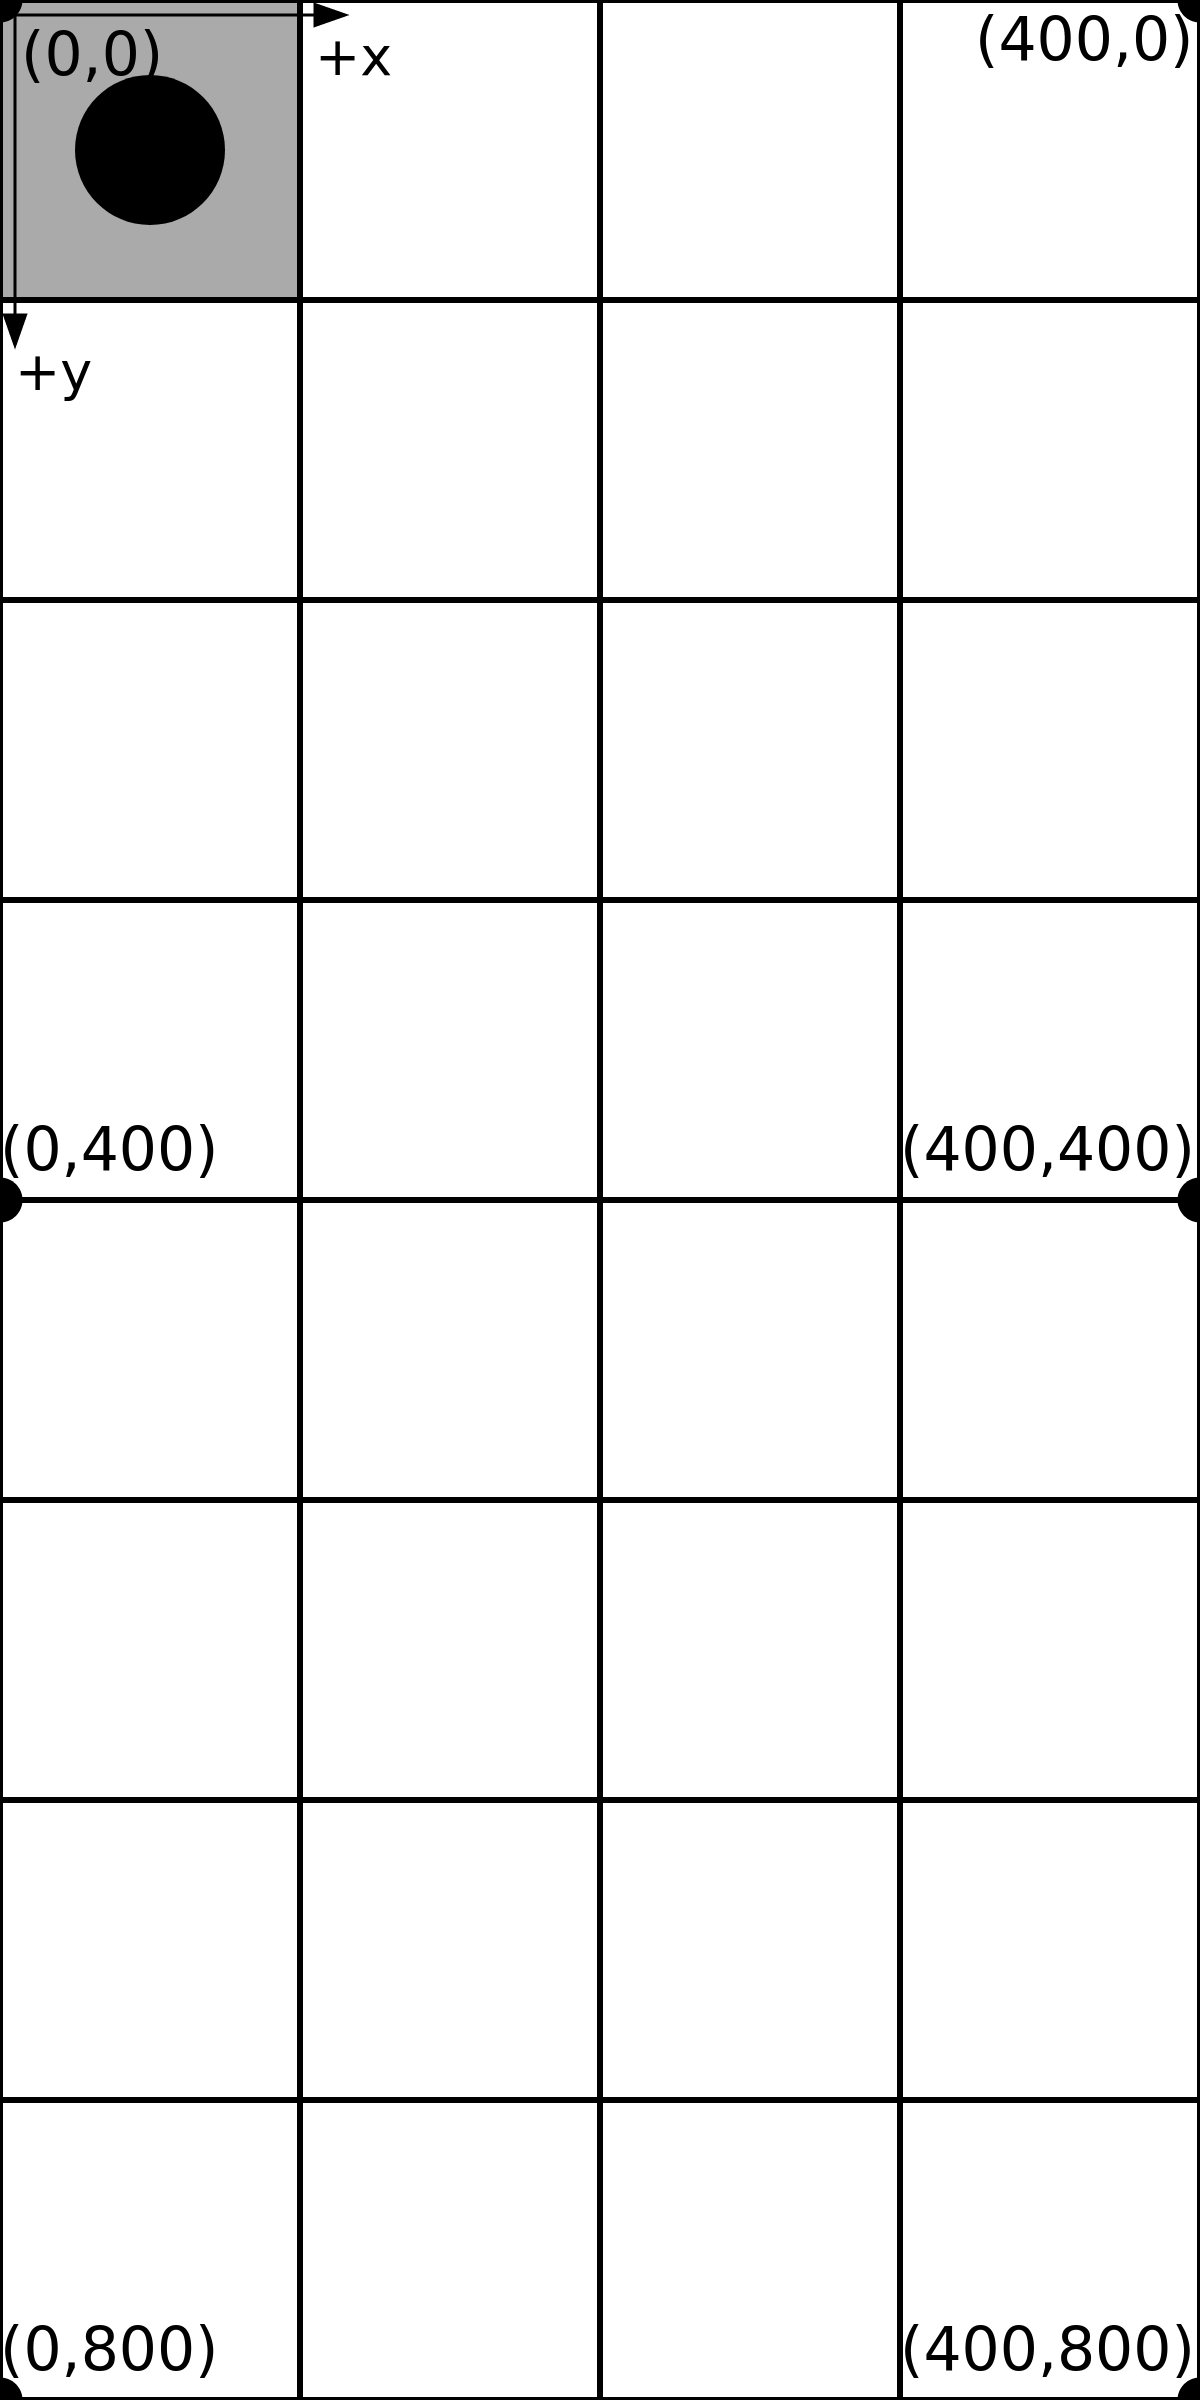
Here is some code you can add to the beginning of your program to highlight the new coordinate system:
shownewaxes = true;
If you add this to your code your program will behave like this
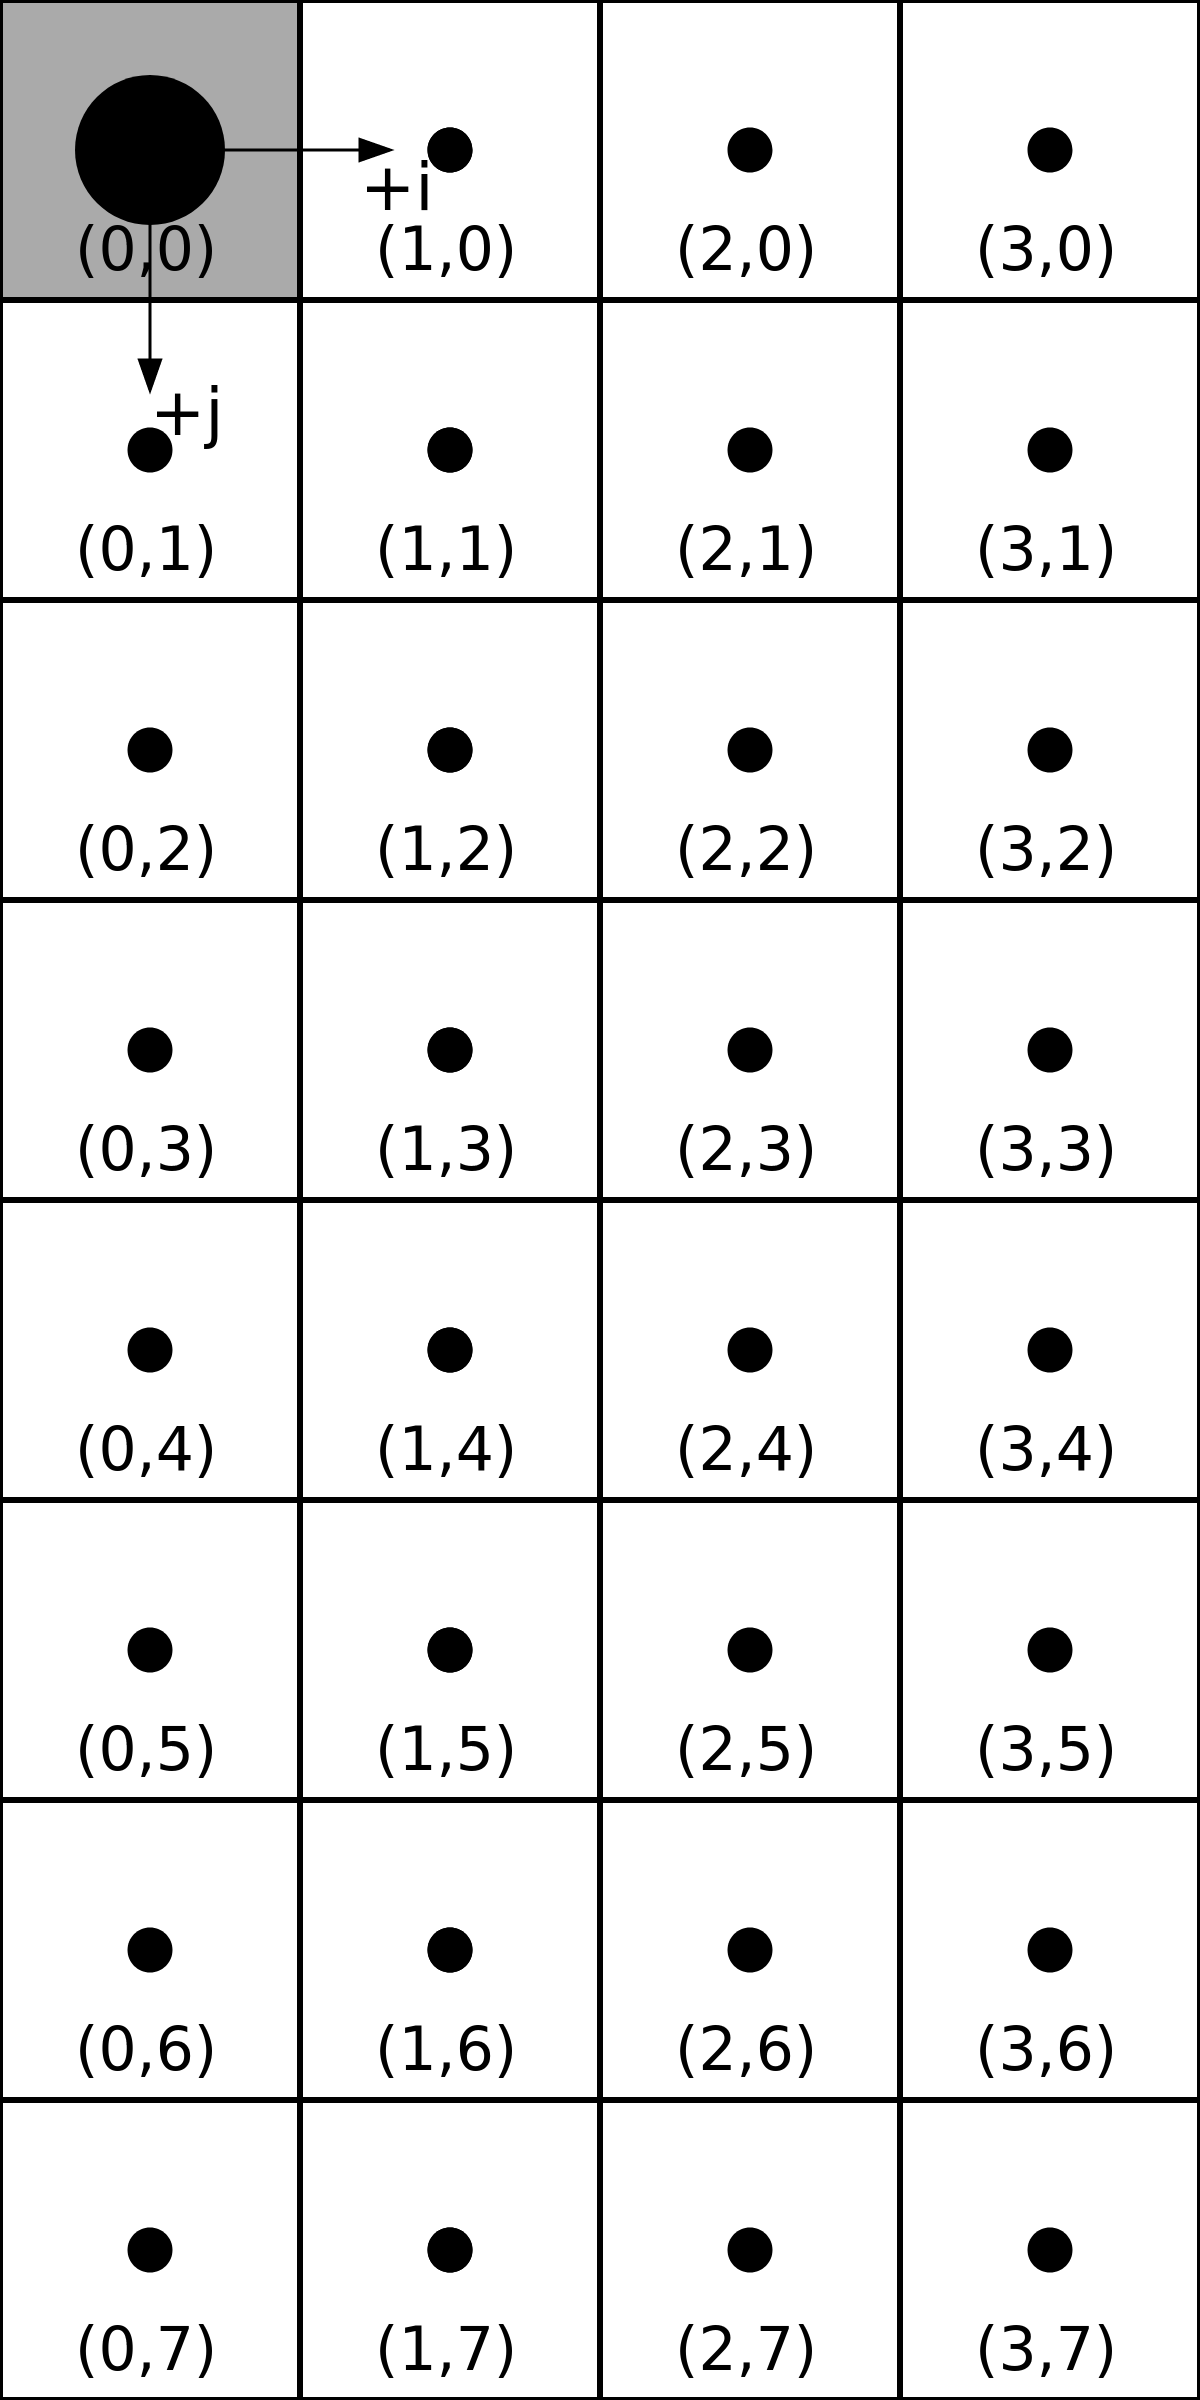
Goal: Define a drawChecker function so that drawChecker(0,0); shows a checker in the first square, and drawChecker(0,1); shows a checker in the next square down, etc.
Before we get into the code it is helpful to make a table of how the values in the parentheses relate to the x,y values on screen.
We are going to refer to the first value in the parentheses as i and the second value as j. So drawChecker(0,1) means i is zero and j is equal to 1.
Here is a table with some examples of i,j coordinates and what they work out to in x,y coordinates.
| New coordinates | Old coordinates |
|---|---|
| (i,j) | (x,y) |
| (0,0) | (50,50) |
| (0,1) | (50,150) |
| (0,2) | (???,???) |
| (0,3) | (???,???) |
| (0,4) | (???,???) |
| (0,5) | (???,???) |
| (0,6) | (???,???) |
| (0,7) | (???,???) |
Finish this table!
Here is some code you can modify to do this:
// paste this BELOW the last curly bracket of the draw() function
function drawChecker ( i , j) {
     x = ????; // something related to i
     y = ????; // something related to j
     fill(0,0,0); // rgb 0,0,0 means black
     circle(x,y,50);
}
Your job is to replace the ???? with something that converts i, j in the new coordinate system to the right x,y in the old coordinate system
Note: If you do this correctly, your code won't behave any differently because currently we are defining drawChecker but we are not actually using that function anywhere. In the next part we will make a change to the code so you can check if it worked or not.
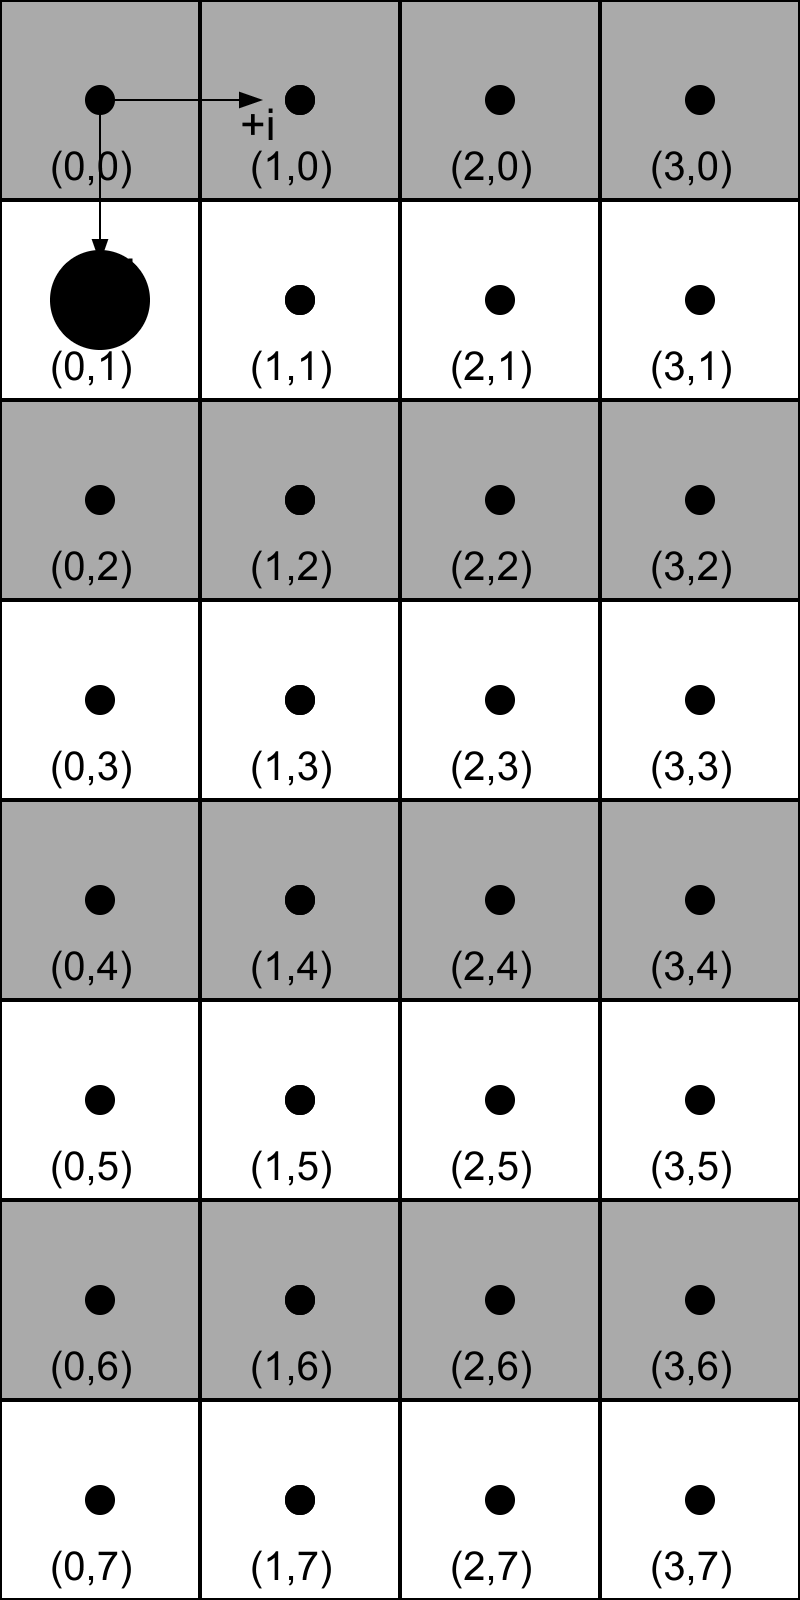
Now we need to test our new function.
Replace this code in the draw() function:
  fill(0,0,0); // rgb 0,0,0 means black
  circle(xchecker1,ychecker1,50);
with this:
drawChecker(0,1);
If your definition of drawChecker is correct your program will behave like this
Hopefully by this point your program can draw checkers using the new coordinate system. Unfortunately, the checker doesn't move any more when you press 1 on the keyboard. Let's fix this in a few mini-steps:
Remove/delete this code:
xchecker1 = 50;
ychecker1 = 50;
Replace it with this:
ichecker1 = 0;
jchecker1 = 0;
Earlier we used drawChecker(0,1); to test our program. This was very helpful but for the checker to move we need to use variables in place of 0,1
Remove/delete this:
drawChecker(0,1);
And add this:
drawChecker(ichecker1,jchecker1);
In the code there is still this line:
if ((keyIsPressed == true) && (key == 1)) ychecker1 += 100;
The problem with this code is that it still uses ychecker1 (which is no longer defined).
Fix this code! Sorry, no hints here.
If you make this change correctly, your code will behave like this
Step 8a. Learn about modulus
The % symbol in programming is called "modulus". In a math class you would call it "the remainder".
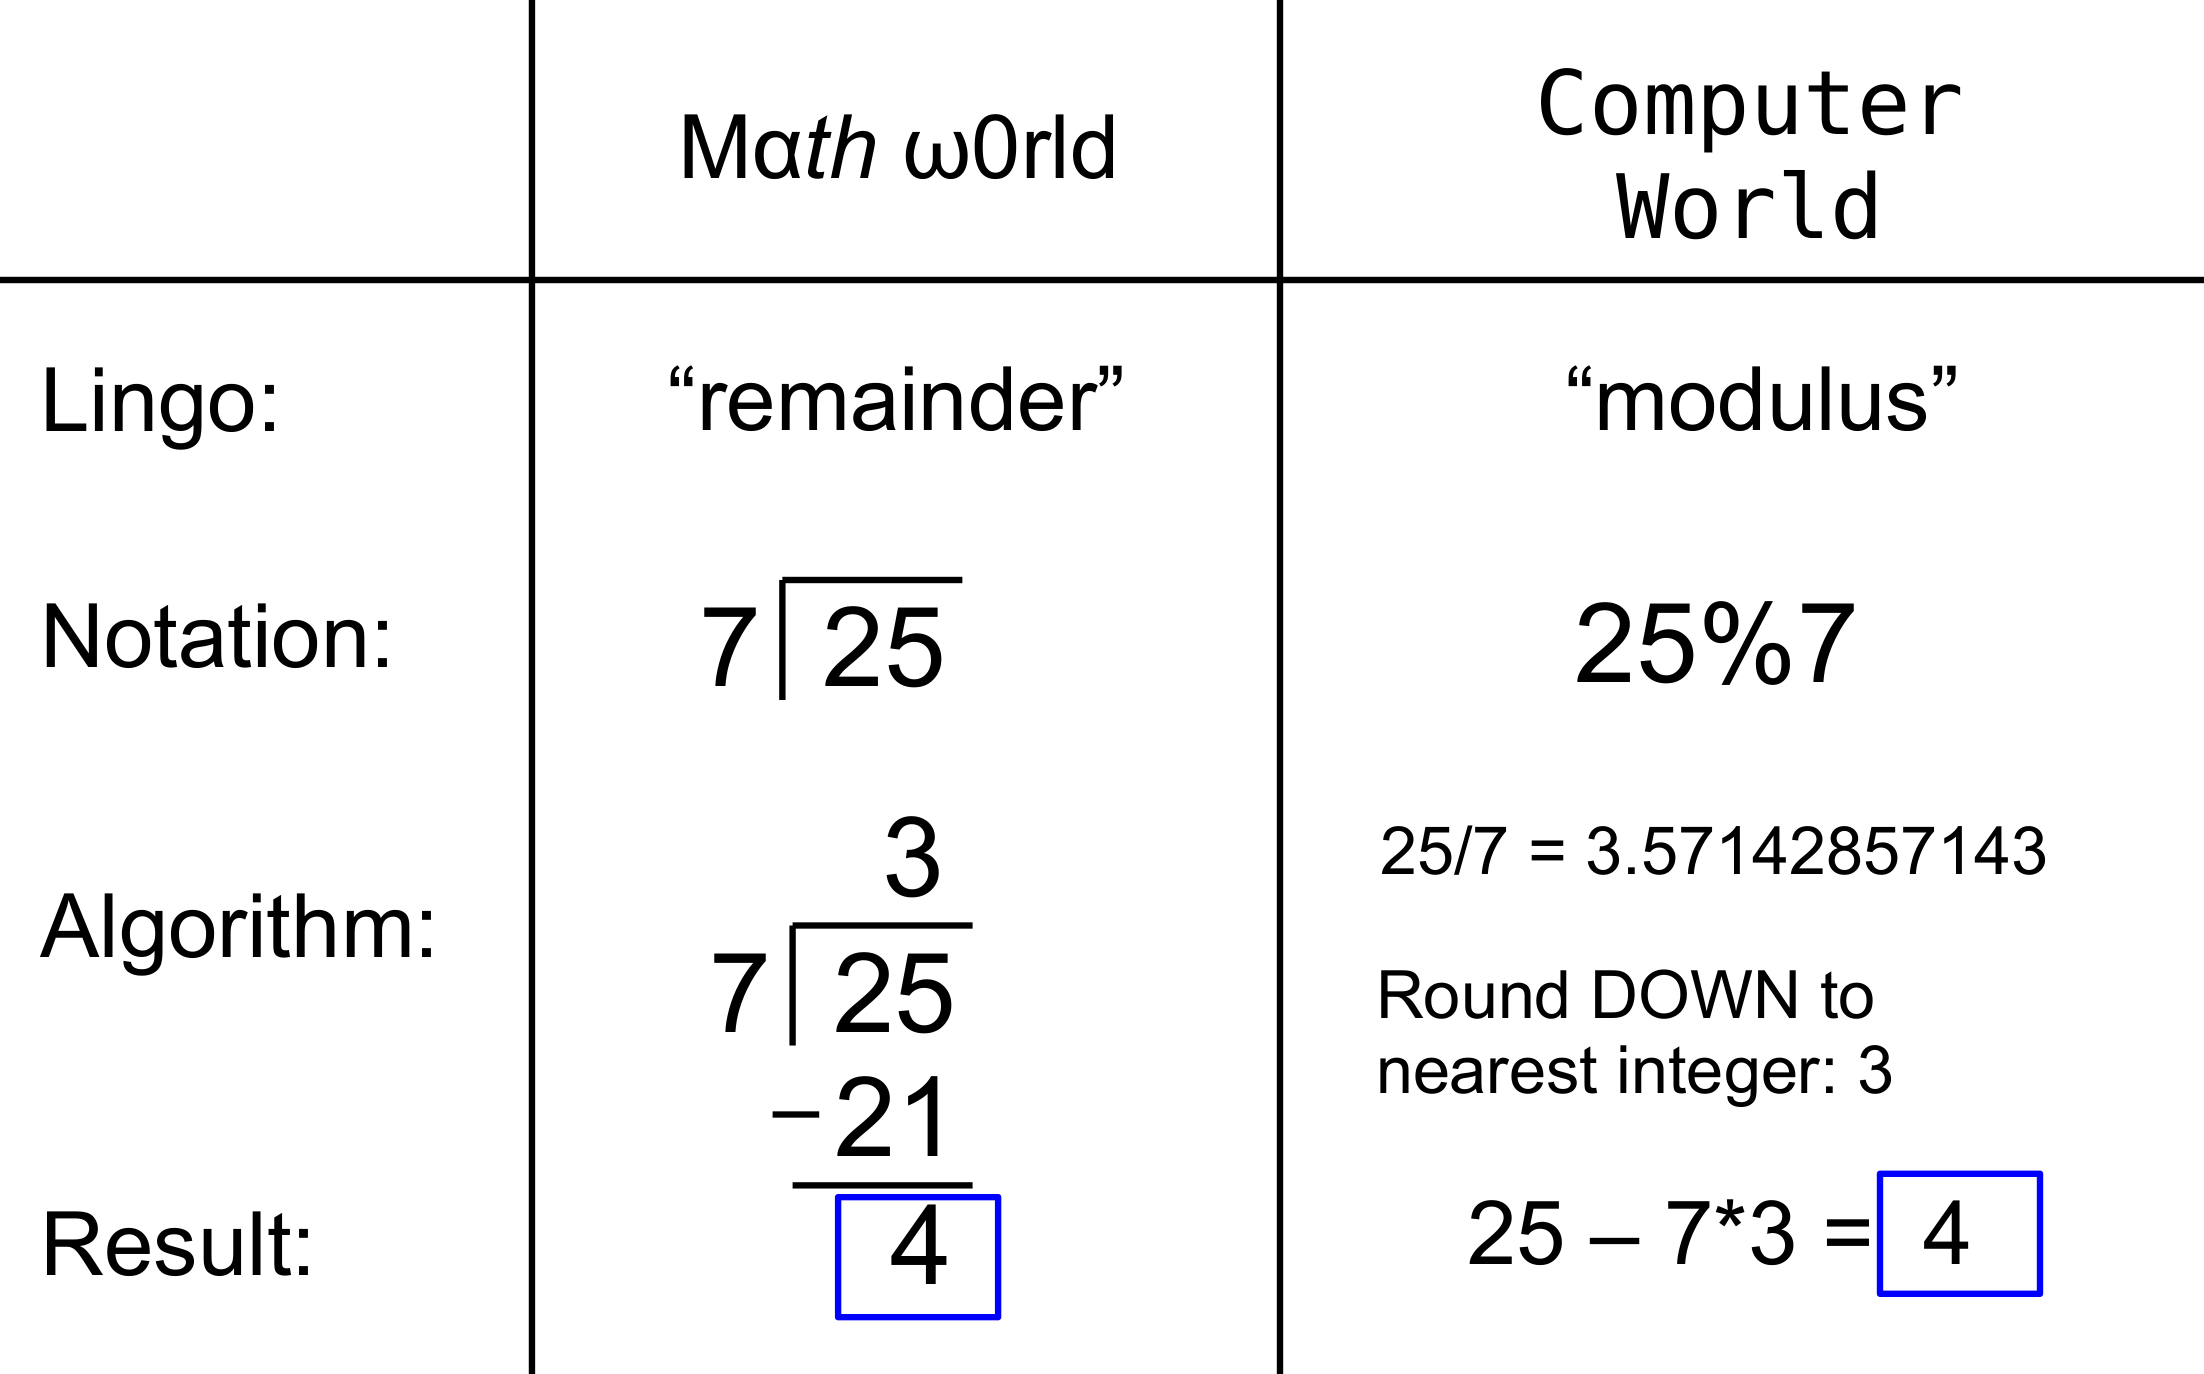
As shown in the diagram above, 25 divided by 7 has a remainder of 4 because 7 goes into 25 three times and there is 4 left over (because 25 minus 21 is 4).
In a computer program 25%7 would evaluate to 4. Double check this by adding this to your code:
createP('25%7 = ' + 25%7);
Test out another combination of numbers! Double check that the result is the same thing as the remainder. DON'T use the same numbers as another student
Fun fact: The modulus will be useful to us in later in sections when we talk about cybersecurity and encryption.
Step 8b. Use modulus to figure out whether an integer variable is an even or odd number
The modulus is helpful for figuring out whether integers are even or odd because we can do things like this:
intnumber%2
where "intnumber" is some integer number. Because half of all numbers are divisible by 2 we will find that intnumber%2 works out to either 0 or 1 depending on whether it is even or odd (or is it odd or even?)
If intnumber is even will intnumber%2 work out to be 0 or 1?
If intnumber is odd will intnumber%2 work out to be 0 or 1?
Step 8c. Use what you learned
Here is some code you can add to your program inside the draw() function to give the player advice on moving the checker:
if (jchecker1%2 == ???? ) createP('Advice: Move Checker 1');
Add this right below where it says "// give the user advice here"
It is your job to decide whether the ???? needs to be replaced with a 0 or 1. (Hint: it is important to move the checker if it is on an even row because the last row (7) is an odd number)
If you add this your program will behave like this
At this point you should have all green check marks! Yay!
You have probably noticed that we have only used one checker here even though the real game involves four checkers.
Modify your code so that there is four checkers and that they move down with the keyboard keys
Make sure to give the player advice on whether to move the checker downwards depending on which row the checker is on.
At the very end of the Half Checkerboard Challenge (Part 1. The Basic Game) there was a challenge to randomize the initial y position of each of the four checkers using the random() function. If you did not do that challenge then, consider doing it now!
1. Complete Steps 1-8
Make sure your program behaves like it does at this link You should be able to get all green check marks by the end of Step 8.
2. Answer all the questions in questions.js
Getting the code to work is only part of the task of this activity. There are various reflection questions in questions.js that you should answer!
3. The Challenges
There are two challenges in this activity including adding three more checkers and giving the checkers a random initial position Ask your teacher if they want you to do any of the challenges If they say no you can still do them just for fun!
4. Submit your code
Submit your code to your teacher before the deadline so they can view it and give you feedback. Talk to your teacher if you are not sure how to do this.