Creating Drawings: the Grating Mount Base and a quick glance at the Hypotenuse
Please download this set (~2 MB) of parts and other misc files to a separate directory.
This section covers technical drawings. To begin with there are some advantages of setting up a format file. If you create a drawing using a format file, when the new drawing first opens you will have the opportunity to answer questions posed by variable names set from the format file. These names can be whatever you want, as the format file itself is controlled by you.
First, New/Format and name it something useful; landscape_with_titles, portrait_plain, or perhaps after a printer that the format file is tailored to fit. Note the dimensions for the paper size; if printing on 8.5”x11.0” paper, you want the standard size of “A.” When specifying template, choose Empty, as opposed to Empty with section. Click ok.
First we will construct a table; from the menu manager, Table/Create. We desire it to be ascending and leftward. If you know the crucial requirement in number of characters for what is to be displayed on all of your drawings, by all means choose By Num Chars.
As Pick Pnt is selected, we’ll have to pick a point for the table to begin and then progress in the directions indicated above by our choices of ascending and leftward. Choose this point very close but not touching the bottom right hand corner.
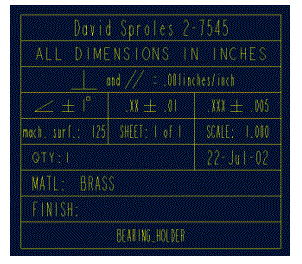
 On the left is an example of what my format
sheet contains for a table in the bottom right hand corner. It’s 0.5 drawing units wide and has row
heights of 0.15 drawing units.
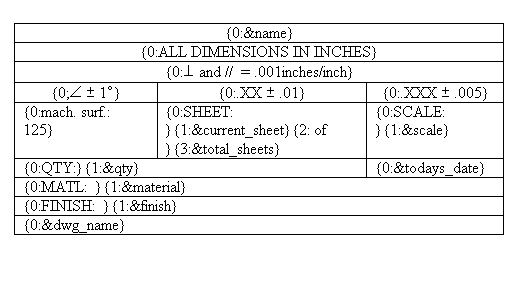
To the right is a table that has the text my format file contains, though spaced for clarity. The representation including brackets, numbers and colons is reached by right-click-holding on a cell and looking at its properties.
The basic way to look at these variables is that some are user-specified and will be asked for at the beginning of each page’s creation (qty, material, finish, name) and some are internally specified (dwg_name, todays_date, scale, current_sheet, total_sheets). I’ve not looked into other variables, as I found this table to be sufficient.
The white box that seems to imply margins seems to be constructed for that sole purpose. By clicking on the endpoints of a line-segment, the menu manager will bring up some useful choices. Abs Coords will allow you to specify, in inches, placement from the bottom left corner of the page. I took the time (and paper required) to figure out exactly what my printer’s margins were and placed the box just barely outside of that range. Now I know that my drawings must stay within the box by some small amount and the box itself is not printed.
Once this file has been created, feel free to close it.
Next, open the base_s part and familiarize yourself with it. This part is moderately complicated and will require at least two sheets, if not three, in order to explicitly declare the part’s dimensions.
Before we create any drawings, one must realize that these
drawings are not going to be handed to a computer. An individual with a respectable degree of intelligence will look
over these sheets of paper. They’re capable
of inferring meaning, understanding the part behind the pictures and taking the
dimensions you’ve specified and 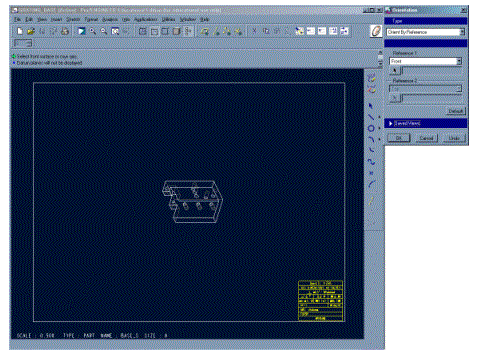 turning them into actual
metal. If you’re not sure how to
designate what kind of shape you want, it is a simple matter to either write
explicitly what you mean or even go talk to someone in the machine shop and ask
for suggestions as to what would be an effective way to denote a feature. With that said, onwards to the first
drawing.
File/New/Drawing and name the drawing grating_base. For the model, choose base_s.prt. For SpecifyTemplate we want Empty With Format. Choose the format file you’ve just created or use the one included with the zipfile at the beginning of this page. Answer any of the questions the format file prompts you for, as this is the first page and will contain all relevant information about the part.
We now have a drawing that consists of only one page. This page has no views. The first thing that must be done is a
switch to hidden-line mode by clicking ![]() . If you do not do this, the pictures will be
a jumble of incomprehensible lines.
. If you do not do this, the pictures will be
a jumble of incomprehensible lines.
As this is a complex part, we will use the first page as a simple introduction to the part, giving no dimensions. From the menu manager, [Add View/General/FullView/NoXsec/NoScale]/Done. Now click for placement of the center of this first view; choose something somewhat close to the middle (we can be more exact later on if necessary). Your screen should look something like the shot on the right. If the datum planes or other artifacts are displayed, it will be visually helpful to turn them off.
Open the SavedViews tab. Click on Default and then Set. The image may not change, as the part may have been placed in this position automatically. For now this is sufficient; later we will want to begin specifying dimensions and a perspective view is inappropriate for dimension specification. Click Ok.
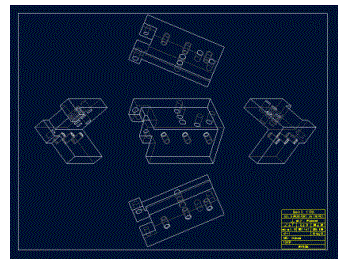
As we won’t be modifying the part while creating a drawing (though it is possible), turning the model tree off might make things more convenient. From the menu bar at the top of the main window, Edit/Value and then click on the number next to SCALE : #.###. Change this to some reasonable value; we want to fit another view of the same size of this one on both the left and right as well as the top and bottom of this view. From the MenuManager, AddView/[Projection/FullView/NoXsec/NoScale]/Done. Click the space roughly midway between the first view and the right side of the screen. This should plop down an appropriately “flipped” view of the part. Those well acquainted with technical drawings expect such flipping to be done correctly, in order to be able to understand the part. Add another view above and below as well as on the left of the main view, all of them projections. Your part should look like that on the left. If you deem it necessary, it is possible to add one more view in the column or in the row, in order to clarify the piece’s shape; you can add projections off of projections. If you wish a projection below the far right projection in the screenshot on the left, it certainly is possible. I would carefully note it as what it is, so as to avoid confusion.
This “introduction” sheet is now finished; we shall add another at this point. Exit out of the views menu if you are there (the highlighted Done may not be the correct Done to exit this menu.) Click Sheets/Add and the program should begin to ask you the same questions it did when we first began the file. I think only the “name” field is necessary beyond the first page.
 Note that at the top of the
page you can change which sheet is displayed by the numeric counter circled in
magenta in the shot on the right.
Add a view, but this time used the saved view “Front.” Add a view above, below and to the left of the drawing. Begin adding dimensions; Insert/Dimension/NewReference. I suggestion becoming acquainted with the hot-key for this, alt-i-m-n. At this point, adding dimensions is an exactly similar procedure to adding dimensions in the sketcher. In the zipfile at the top of this document is a drawing (small_grating_base) which has all its required dimensions specified. It might be highly instructive to look at how the file is constructed and what dimensions are shown where. For my first drawing, this is precisely what I did, using one of Josh Holt’s drawings as a template of where and how many dimensions to put down. Again, a real person will read these plans; so long as someone can understand what is meant and nothing is left un-specified, the drawing is sufficient.
Please note, holes are usually specified distance-to-center. When using Insert/Dimension/NewReference on a hole, avoid using tangent, as this will specify an incorrect distance and will confuse everyone involved.
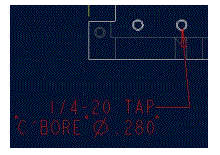
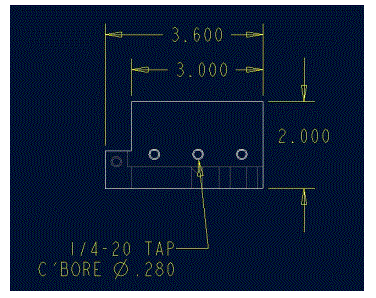 Speaking of holes, the
correct way to denote holes is as follows; if we want a hole to be threaded for
a 1/4-20 screw with a counterbore of diameter 0.280”, we would
Insert/Note/[Leader]/MakeNote and click on the hole from the side that we want
them to drill into and type the note such that it reads as the picture on the
right does. Notice how the arrows for
the 2.000” dimension are on the outside of the lines? By left clicking, we pick up and hold the dimension itself. While the dimension is held, right-clicking
will cause the arrows to change direction.
For notes or dimensions not-between the dimension-lines, while the text
is selected we can adjust points (indicated by red boxes as show on the left)
and cause the text to be to the left or right of an arrow. The arrowhead itself and what it touches is
adjustable in a similar way. The far
left point (when the text is on the side of the arrow as it is in the left
picture) will allow one to change the size of the text-box, causing text to
spill over to the next line.
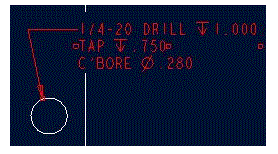 For the riser part, where
we didn’t want the hole to go all the way through, one would type as shown on
the left. It is possible to use the
notes generated by ProE for these holes; unfortunately these notes are not
always complete and you may not get what you indicated on the model itself.
If you need a screw of some sort to pass through a hole without necessarily touching, “1/4-20 CLEAR” is the appropriate notation.
If you’ll recall the curved notches we created in the hypotenuse, specifying them is actually quite simple. An example is included in the zipfile; a drawing by the name of base_square.
One final note with drawings; it is extremely helpful to export IGS versions of the files and carry them to the shop on disk along with the printed drawings. To generate an IGS file, open the part itself (not its drawing) and click File/SaveACopy and change the type to IGS. It is necessary to export wireframe edges as a part of this file (this information was passed to me by a member of the shop.)
Included in the zipfile at the beginning of this document was all of the parts required for this project. It should be possible to open A_Sinebar_Implementation.Asm and play with the model’s final version as constructed while generating this document.
This completes my extremely modest tutorial of ProE.
David Sproles, 2002-08-06